How to Run Scalable Wordpress on AWS (Amazon Web Services) Tutorial
Intro: Amongst other things, Parallax are an AWS Partner. This tutorial will get you up and running but if you need anything else in terms of support, help, security or consultancy come and say hello – we’re nice people.
So… the shared hosting box you’ve been using to run your Wordpress site isn’t cutting it anymore? Fear not, this is what happens when people actually want to visit your site. The usual sequence of events is that your site starts slowing down, you get database connection errors and everyone starts looking at the website in a sad, disappointed way while the rest of the business is revelling in this new-found Internet fame but struggling to comprehend why something so simple as keeping the website online isn’t happening.
In this tutorial, we’ll step through how to install and run Wordpress on Amazon Web Services in a way that means your data is safe, your site is fast and your hosting grows and shrinks in-line with how busy your website is, using Elastic Beanstalk for devops, Aurora for database and Elastic Filesystem for upload storage.
If you’re coming from a traditional VPS/shared hosting background, AWS can be a bit scary. It’s not, it’s just a little bit different and you have to do a bit more of the legwork yourself to get everything going the way you want it to.
Whenever we’re going to be using a Terminal in this tutorial, the text will be styled like this. Bear in mind that you will have to press enter/return after each bit of terminal input.
Step 1: Get an AWS Account
You’ll need to have an account with Amazon Web Services to get started. It’s easy enough to do, they do usually put a verification call through to you when you sign-up so this can take a little while to get going.
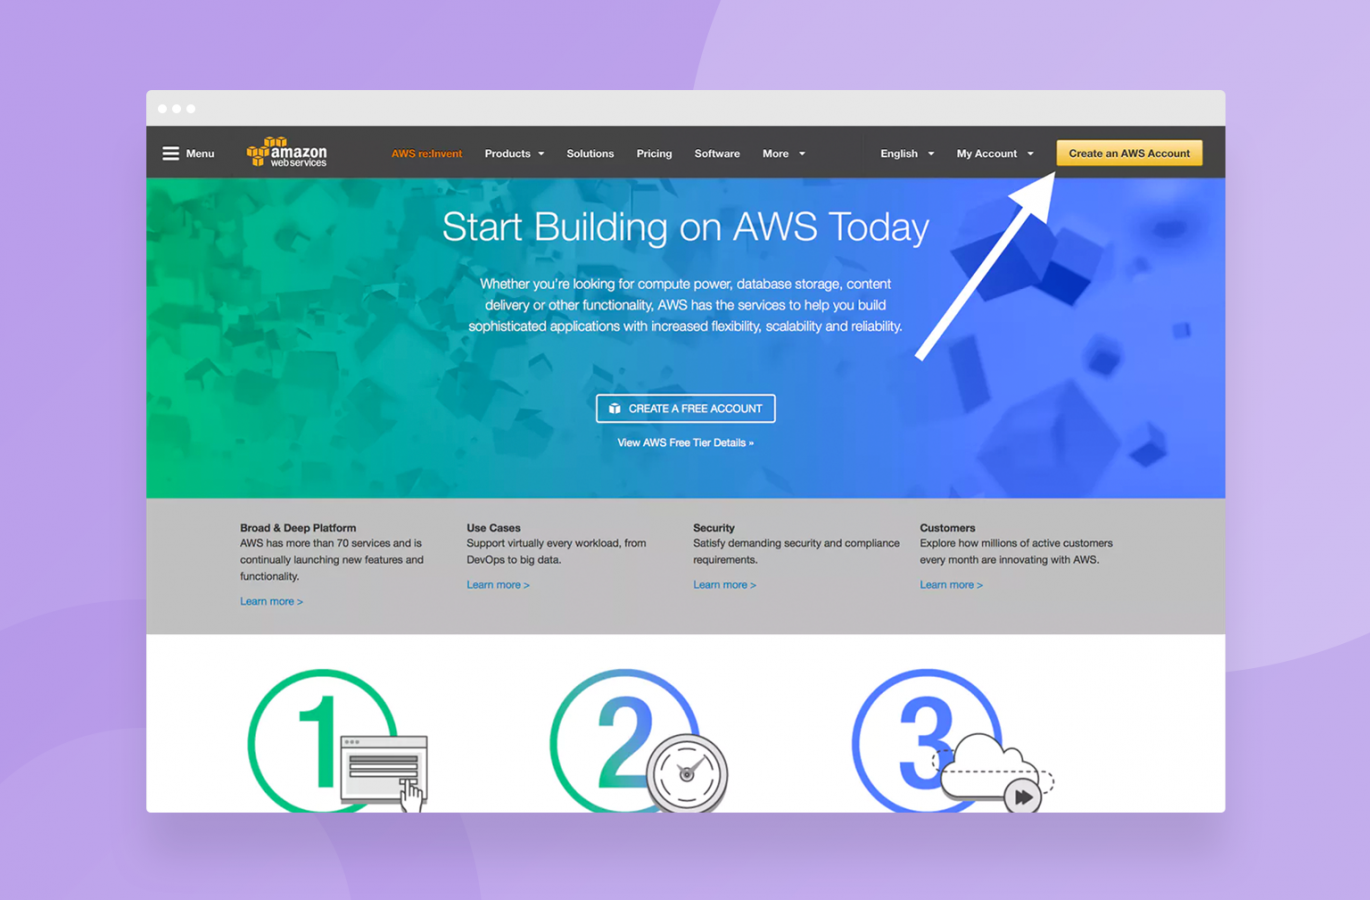
If you already have an AWS account, take a moment to give yourself a high-five. You’re winning! If not, go ahead and create an account.
Step 2: The Source Code / Install Git
You’ll want to have your source code in a folder on your computer, managed using Git. If you’re already using Git, that’s also awesome. If not, you’ll want to install it, either for Windows or Mac.
Git is like a versioning system for files. If you think about a paper form, like the (endless) ones that the bank make you fill out when you apply for a mortgage, Git would be a bit like a system that you use to store a form in each stage of it being filled out (if you’re like me, probably over the course of a few days; procrastination and paperwork go hand in hand).
The upside of Git is that when you inevitably make a mistake filling out said form, you can go back to a previous version really easily. It’s also the thing we’ll be using to store our code so that the other bits of Amazon Web Services we’ll be sending it to can make sense of any changes in it.
Installing Git on Mac:
1. Download the latest Git for Mac
2. Run through the installer as you would with anything else
3. Open a Terminal (Applications/Utilities/Terminal)
Installing Git on Windows:
1. Download the latest Git for Windows
2. Run through the installer as you would with anything else
3. Open a command prompt (type “CMD” in the start menu search bar)
All Platforms: Configure your Git Identity:
4. Type (or copy-paste):
git --version
If you see something along the lines of “git version xxx” then you’re good – Git is in fact installed. If you see “command not found” then something’s wrong – try running the installer again.
5. Tell git who you are – this is so it can record your details against the changes you make in your code. Run the following, replacing my details with yours (otherwise you’ll be using git as me and that would be weird):
git config --global user.name "Lawrence Dudley"
git config --global user.email "lawrence@parall.ax"
6. Celebrate – Git is now installed on your machine.
Get your source code into Git:
We’re going to use our new-found Git awesomeness to manage our code. It’s fairly straightforward, but there’s a few commands we need to run to make sure Git knows where our code is and how it should manage it.
I’m doing this on a Mac – the Windows commands should be identical other than things like changing directory which is “cd” on Mac and “dir” on a PC.
I’m going to be using a fresh copy of Wordpress that I’ve downloaded, unzipped and put on my desktop.
1. First, we’re going to change directory to our unzipped folder:
cd ~/Desktop/wordpress
2. Then we’re going to initialise a Git repository in this folder:
git init
You should see something like: “Initialized empty Git repository in /Users/lawrencedudley/Desktop/wordpress/.git/”
3. Next, we’re going to add all the files in here to Git:
git add -A
4. And then we’re going to commit those. Committing in Git is a bit like putting a stick in the sand and saying “at this point in time, this is what everything looks like and we shall refer to it as this”. In this case, we’ll refer to it as “initial commit”:
git commit -m "initial commit"
You could change whatever is between the two quotes to say something else – it’s not anything functional, just whatever you’d like to call it.
5. Check that your code’s all committed:
git status
If you see “nothing to commit, working tree clean” then you’re all set to go!
Step 3: Configure an Elastic Beanstalk Environment
There’s a few different (many in fact) ways of using Amazon Web Services to control some servers. You could go straight down the EC2 route, which would be comparable to running your own VPS, minus any control panels that came with yours, or you could use one of the other management options out there to configure instances and make them run the stuff you want them to (specifically your Wordpress site).
We’re going to use Elastic Beanstalk in this example because it’s simple and extensible enough to do what we’re wanting to achieve and takes care of most of the complicated stuff behind the scenes for us.
Install the Elastic Beanstalk command-line interface
The “eb” command-line interface lets you push code into Elastic Beanstalk.
Amazon have a good guide on installing it.
If you’re on a Mac, it should be enough to run:
pip install --upgrade --user awsebcli
Choose an AWS Region
You’ll need to choose an AWS Region to deploy to. There’s quite a few:
us-east-1 : US East (N. Virginia)
us-west-1 : US West (N. California)
us-west-2 : US West (Oregon)
eu-west-1 : EU (Ireland)
eu-central-1 : EU (Frankfurt)
ap-south-1 : Asia Pacific (Mumbai)
ap-southeast-1 : Asia Pacific (Singapore)
ap-southeast-2 : Asia Pacific (Sydney)
ap-northeast-1 : Asia Pacific (Tokyo)
ap-northeast-2 : Asia Pacific (Seoul)
sa-east-1 : South America (Sao Paulo)
cn-north-1 : China (Beijing)
us-east-2 : US East (Ohio)
ca-central-1 : Canada (Central)
eu-west-2 : EU (London)
Typically you’ll want to choose a region that’s close to where your website visitors are. There is a small caveat however and that is that not all AWS services are available in all regions yet.
As the last part of this tutorial relies on using Elastic File System, a relatively new component of AWS, only the following regions have support for all of the services used:
us-east-1 : US East (N. Virginia)
us-east-2 : US East (Ohio)
us-west-2 : US West (Oregon)
eu-west-1 : EU (Ireland)
We’ve used London in this example extensively but please note that at the time of writing, there is no support there for EFS so if you’re in Europe like we are then Ireland is probably the way to go.
You can pick a region from the drop-down in the top right of most AWS Console screens.
Set up a blank Elastic Beanstalk app
You’ll be at the Console home when you log into Amazon Web Services. It will look a bit like this:
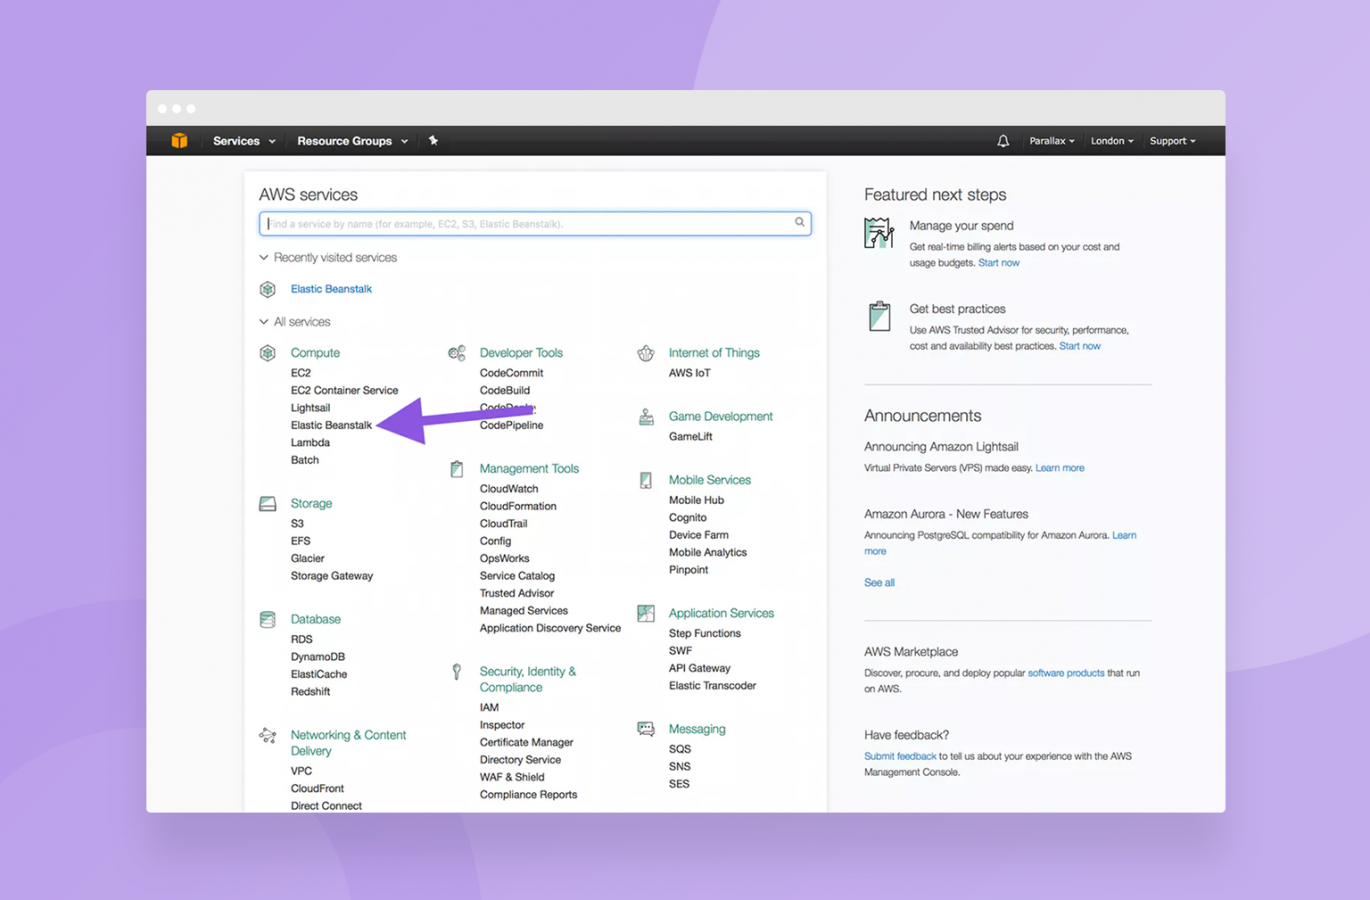
The service you’re looking for is Elastic Beanstalk. It’s under Computer (follow the arrow on the above screenshot) or you can search for it.
Note: I’m using the new user interface that AWS have released for EB in these examples. You should receive a prompt to use the new UI. If you don’t, don’t panic – while everything may look slightly different it’s not miles away from what it used to be and it’s mostly in the same place, called the same things.
Once you open it up, you should see this:
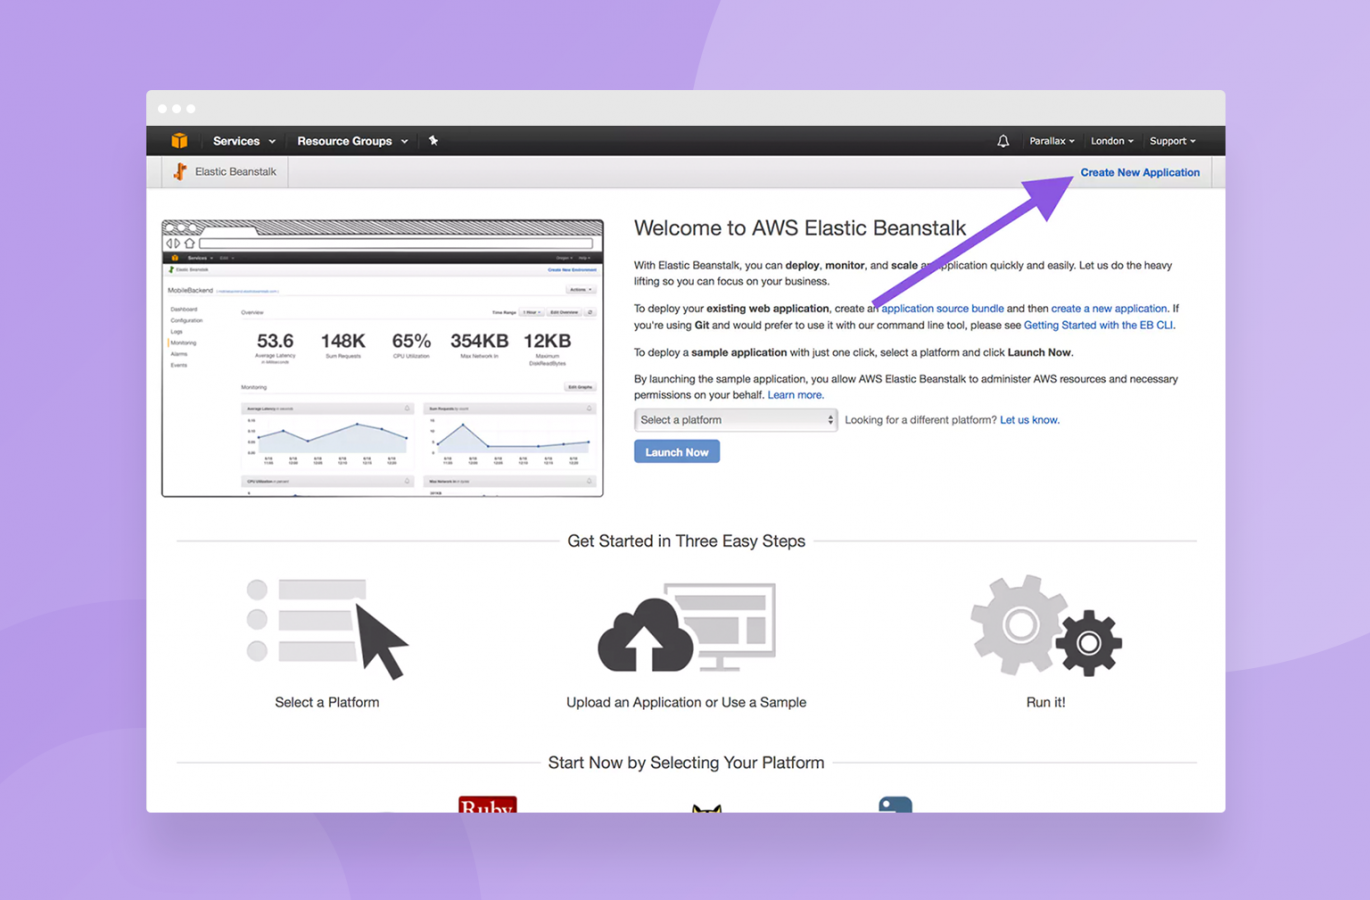
Try to contain your excitement somewhat and don’t go straight in and hit the “launch now” button. We want to go through the slightly less-exciting wizard that appears when you click “Create New Application” in the top right. Again, follow the arrows.
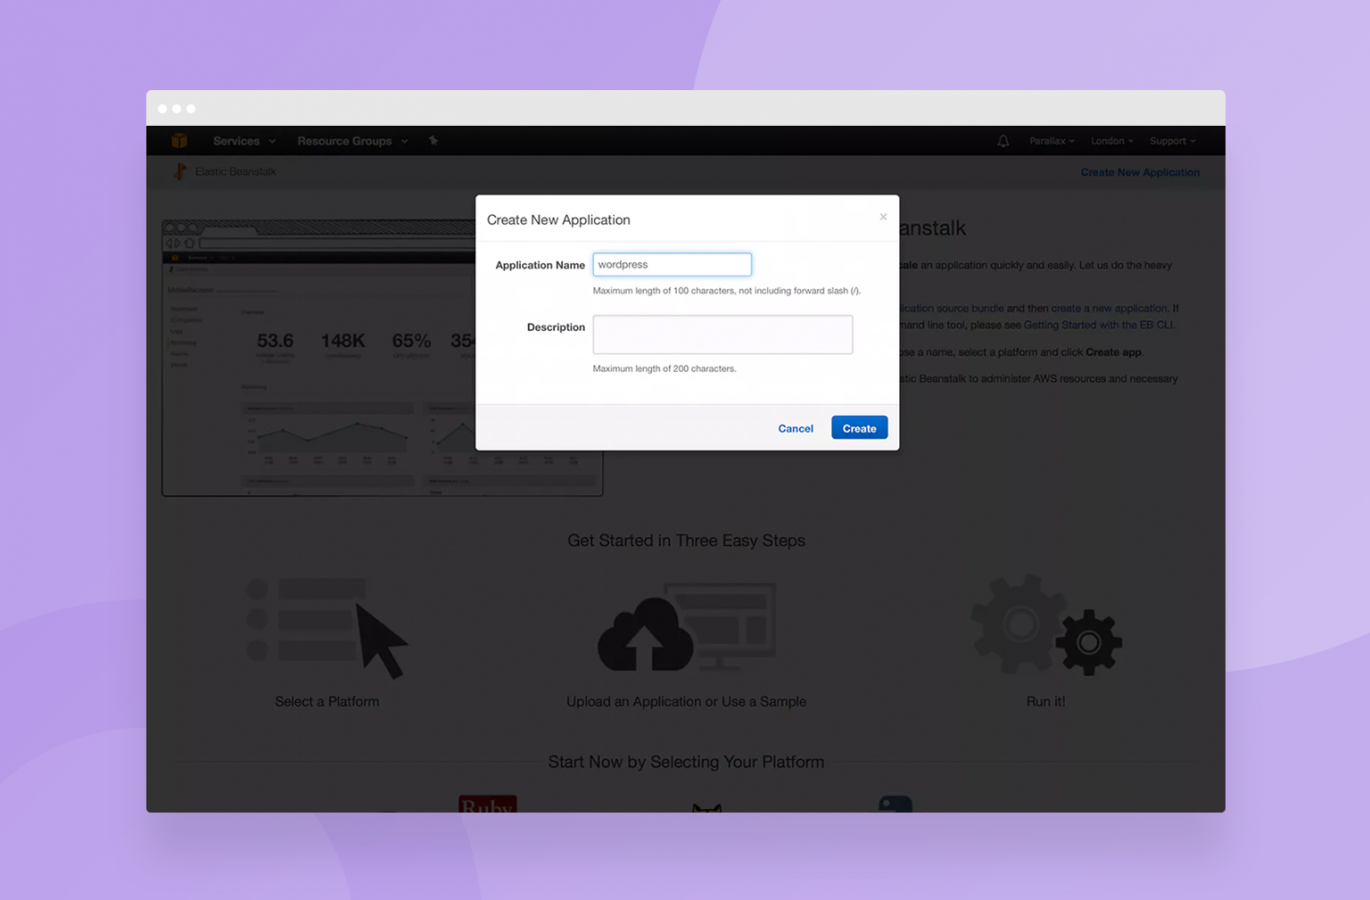
I’ve descriptively called our application “wordpress”. You can go with whatever you want here though.
If you think you’ll be running more than one Wordpress install, maybe go with sitename-wordpress or something.
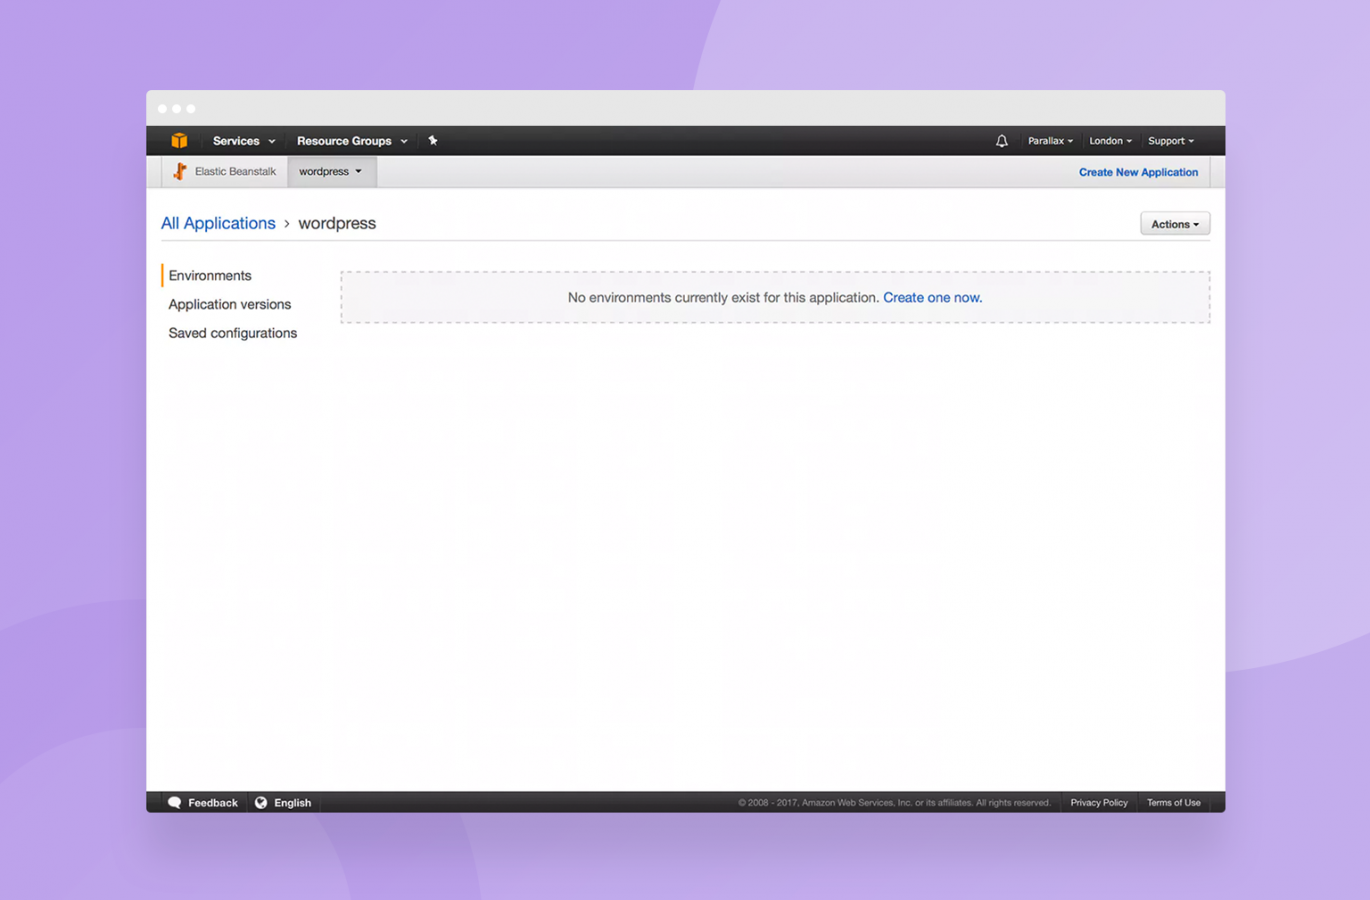
We have an application now, but no environments for it to run in. That’s OK, we can sort that now.
An application is more or less what it sounds like: It’s a set of code that will get deployed. An environment is a place (or server/set of servers) that this code will go onto to actually run.
Most advanced users will have a production and a qa environment. Some people will even have an environment for every different version of their application. We’re going to skip past some of the advanced stuff and just focus on getting things up and running.
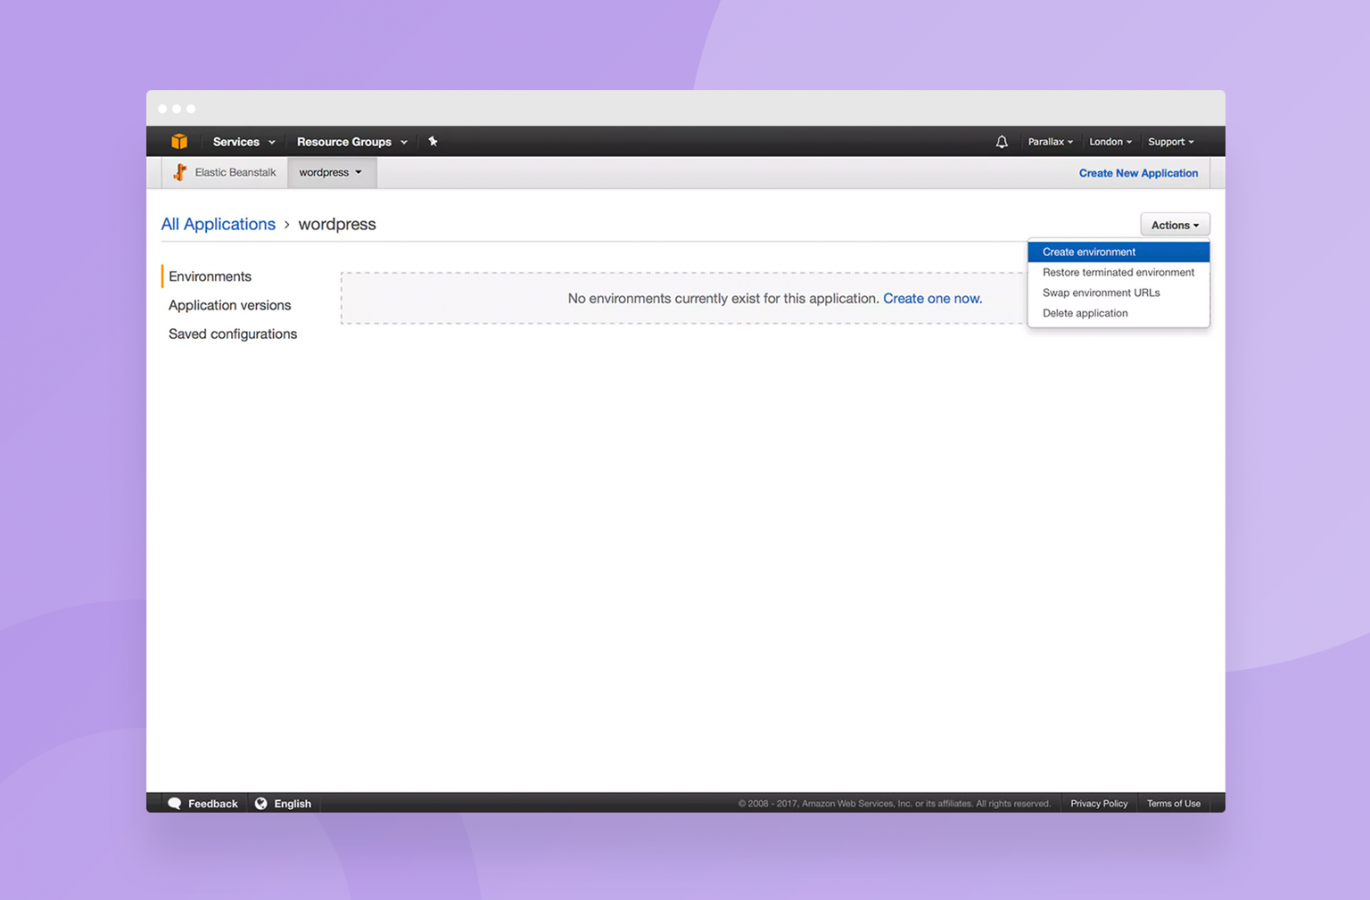
Under “Actions”, you will find “Create environment”. Click it.
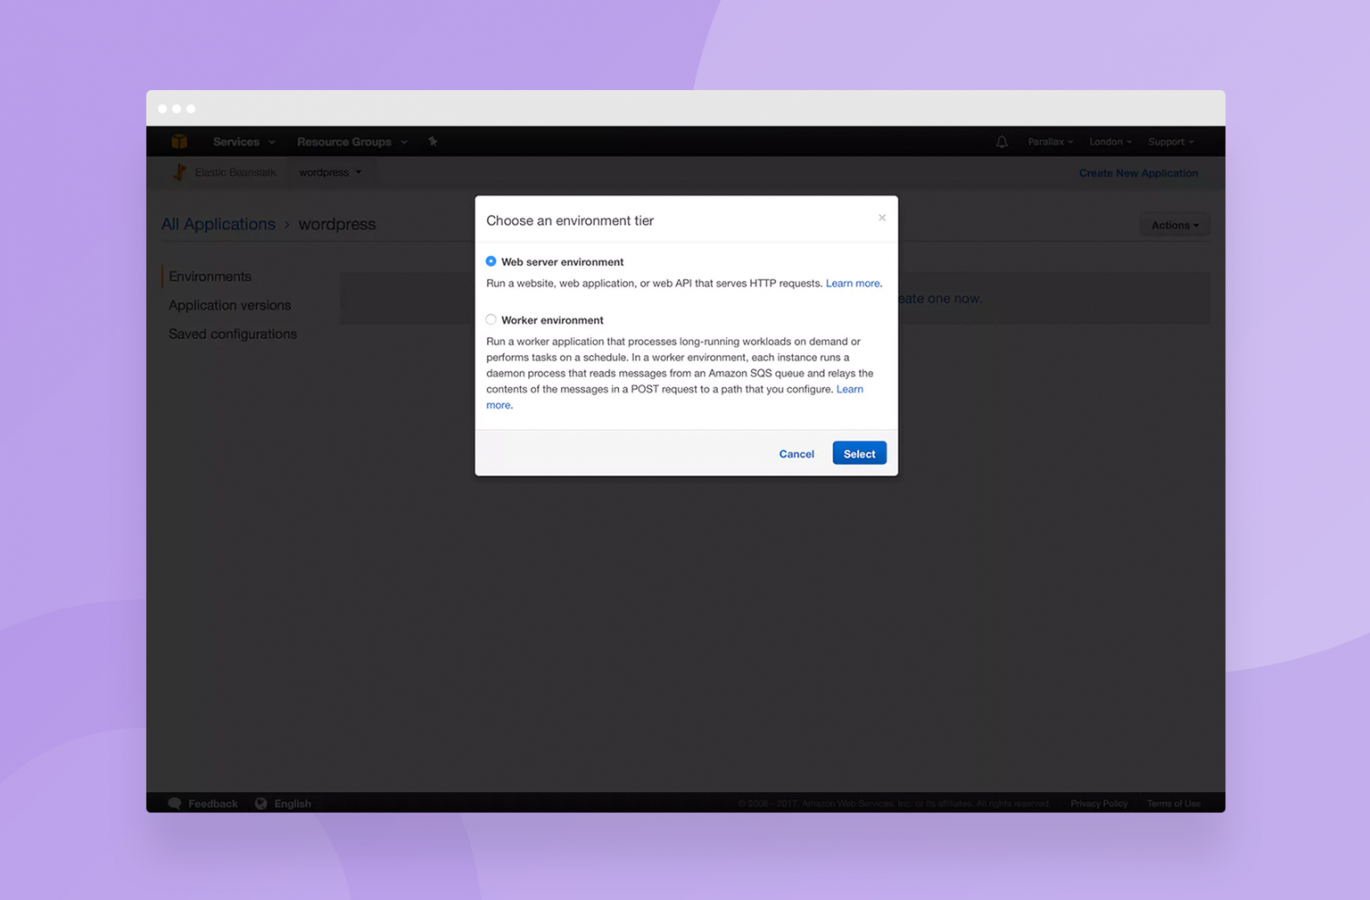
We’ll ignore worker environments for now – you want a web server environment:
Logic would dictate that you select PHP from the dropdown on this next screen and go ahead and click “Create environment”. Logic is wrong. Select PHP from the dropdown but don’t click this button.
Why? Wordpress is still a PHP5.6 beast at the moment (although this is set to change in 2017 sometime) and going with the default version of PHP is likely to break many many things.
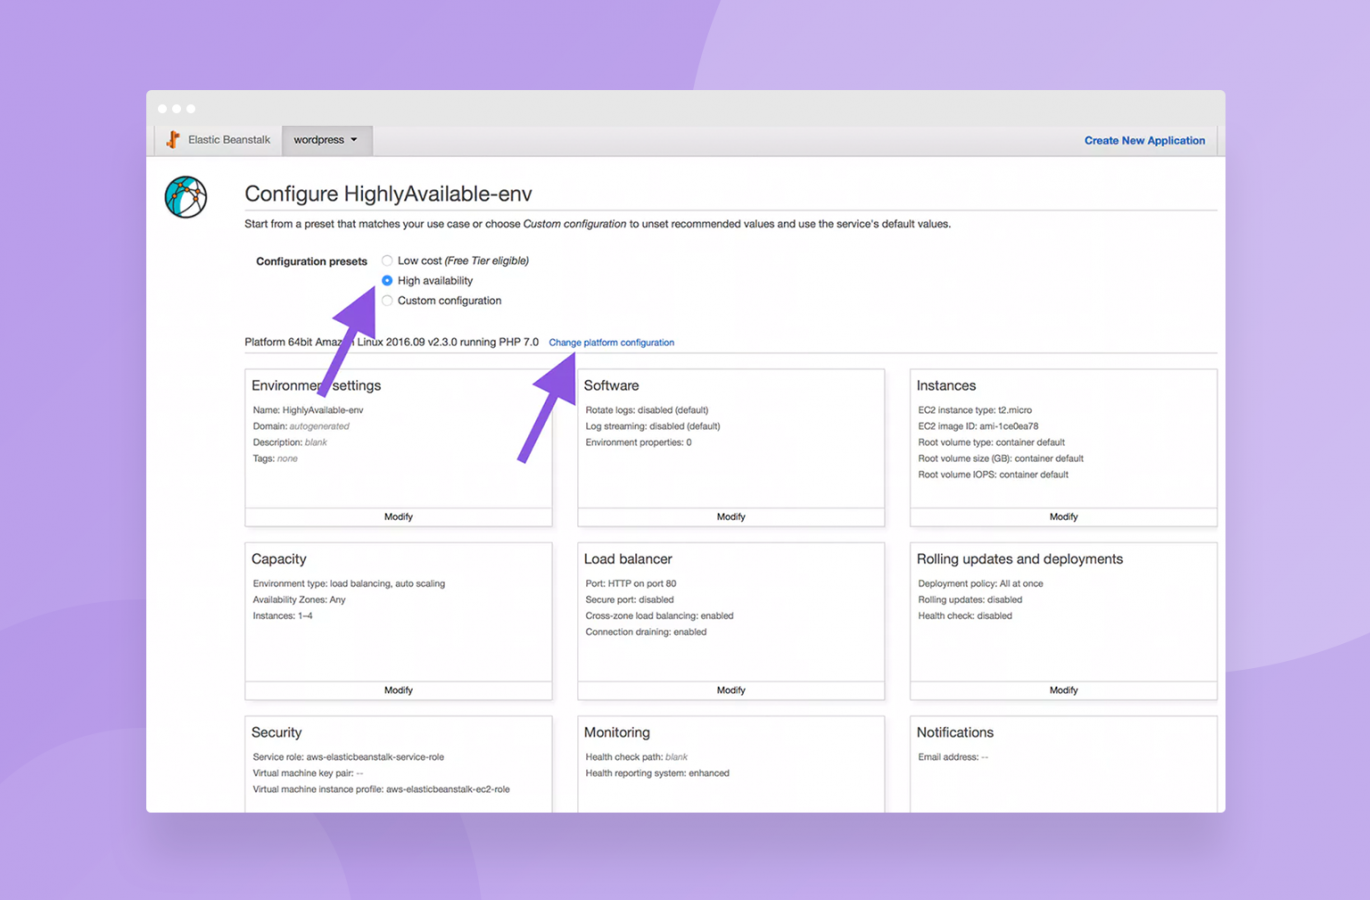
We’re going to click “Configure more options” instead:

It’s probably worth noting at this point that having the Application code as “Sample application” is fine right now too. We’ll worry about getting our actual code deployed into this environment after we’re done configuring everything.
Note that we’ve selected “High availability” instead of “Low cost”. That means that our Wordpress install will be on multiple servers, not just one and allow us to autoscale it.
After selecting High availability, click “Change platform configuration”:
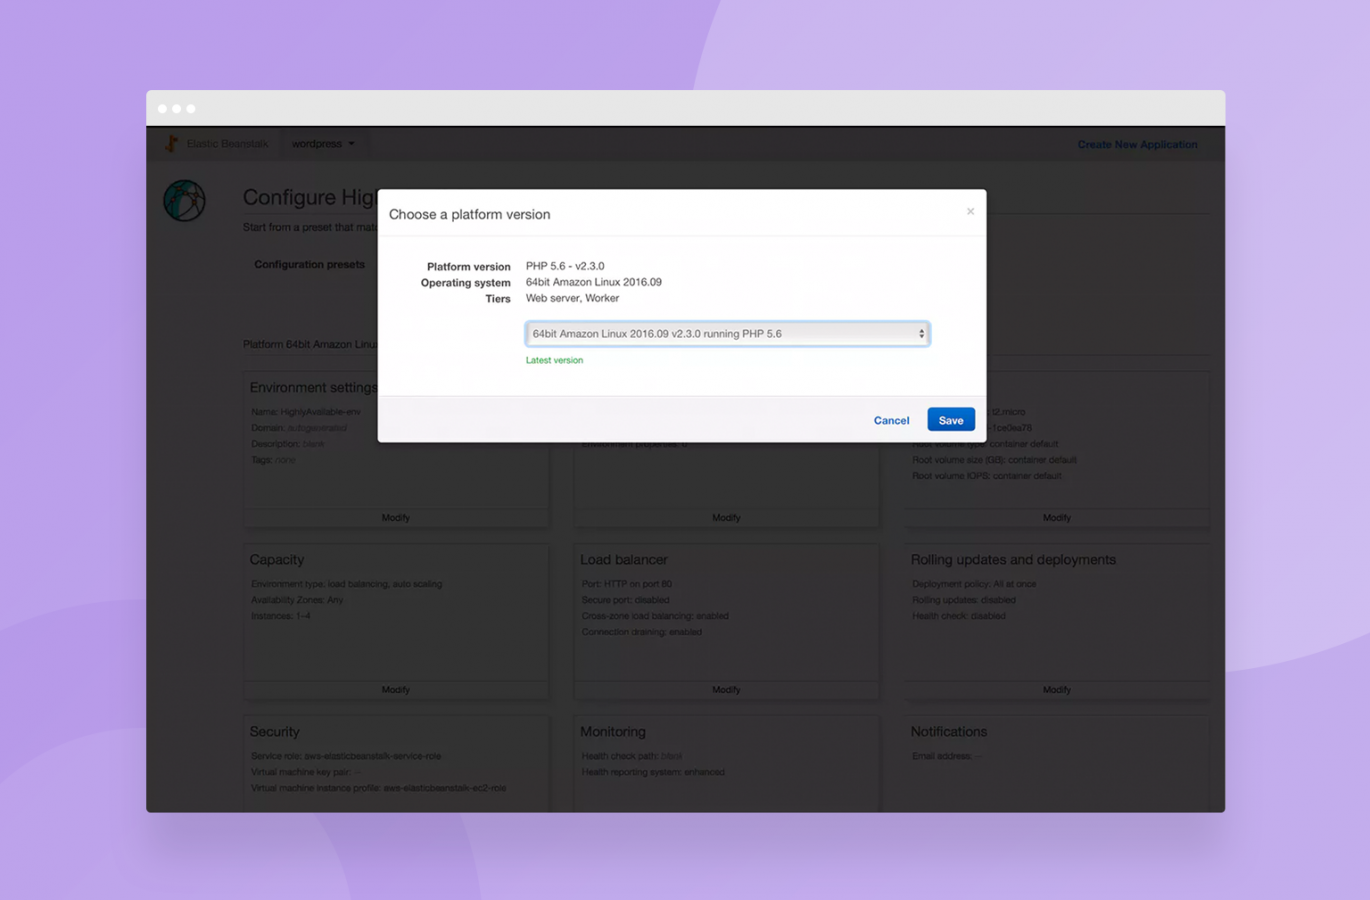
You want to choose PHP 5.6 in this dropdown. 7.0 won’t work currently but may well work in the future. As a bonus, you can actually change this around later without experiencing any downtime. That’s awesome.
You’ll want to open Network, as shown below, by clicking “Modify” underneath it:
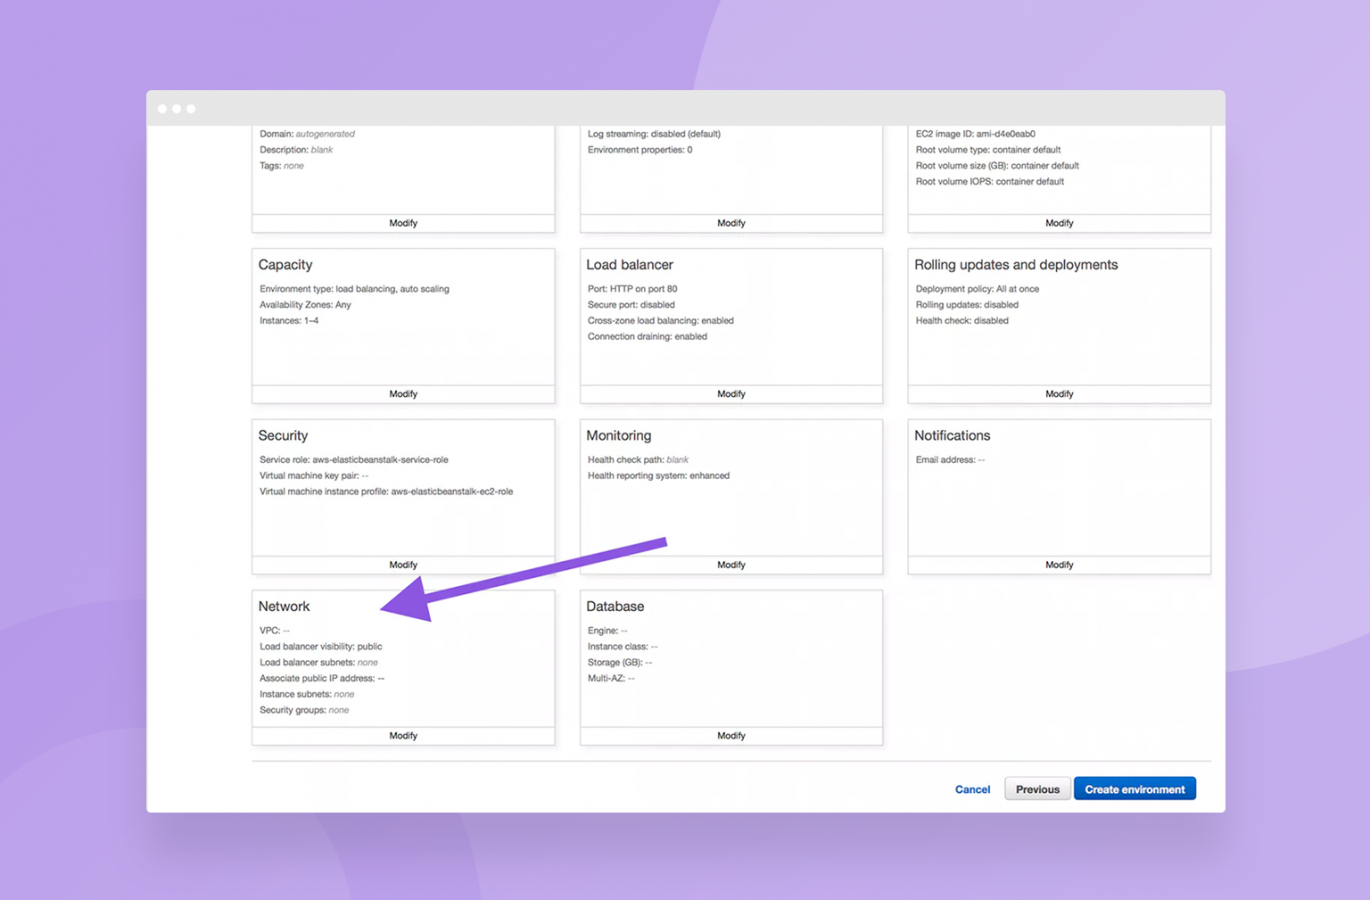
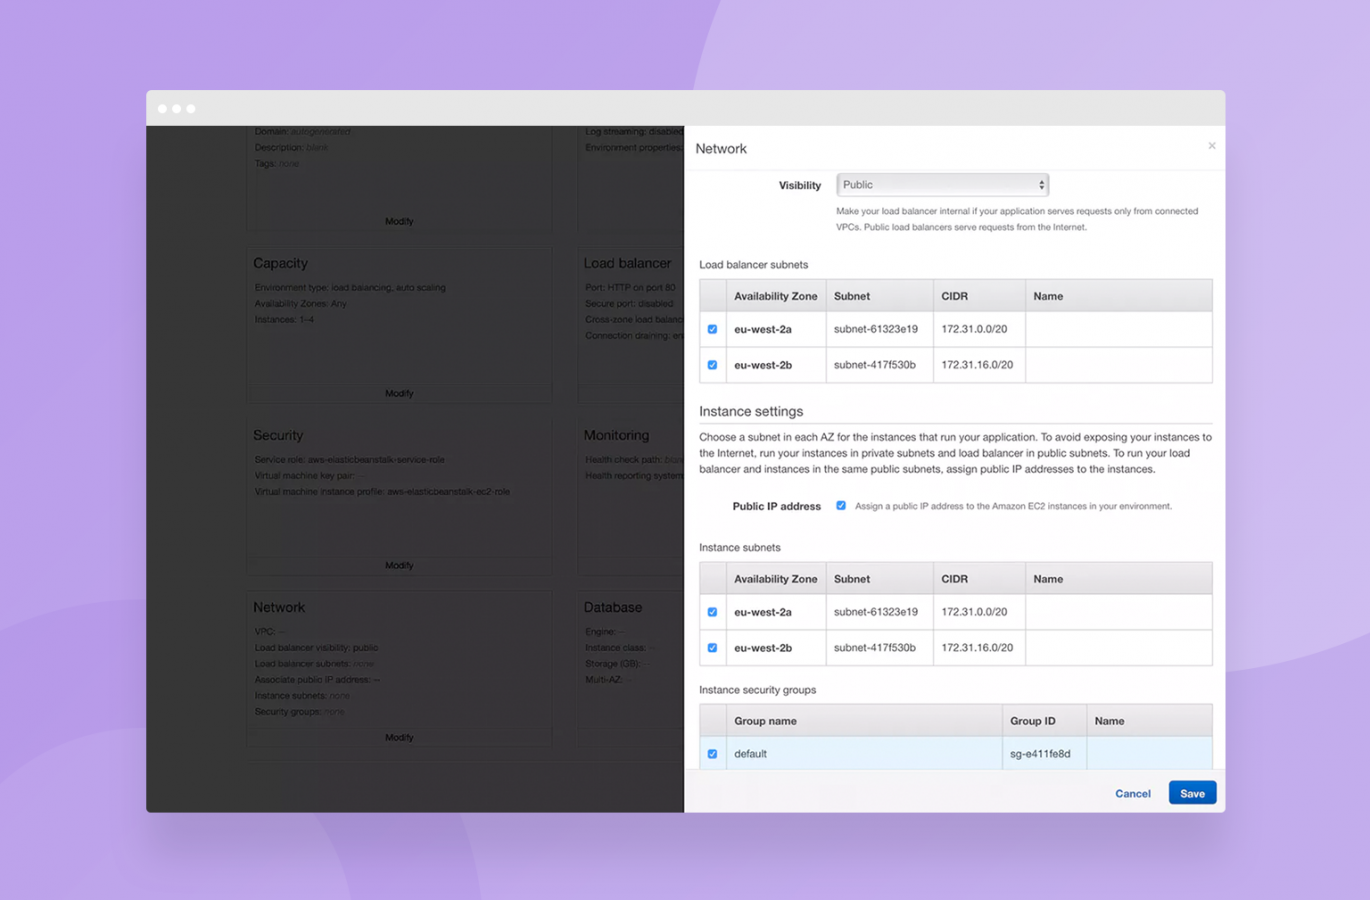
Under VPC, choose your default VPC (there should just be one in the dropdown if this is a new account).
Visibility should be “Public”.
Tick all Load balancer subnets.
Tick “Public IP Address”.
Tick all Instance subnets.
Tick default for instance security group.
If you’re a bit click-happy like me, you will have noticed that there’s a Database option in the configuration screens.
Don’t touch this – as tempting as it is, it doesn’t currently support something called AWS Aurora. Put simply, Aurora is basically MySQL but more awesome and significantly faster.
Because we like both awesomeness and speed, we’re going to configure some of those bits ourselves later on.
One last, optional, step, is to give your Environment a name. This is a good thing to do because if you don’t, it’ll be called “Custom-env” which isn’t particularly snappy. We’re going to call ours “Production”.
You’ll find this setting in the first configuration box, titled Environment settings:
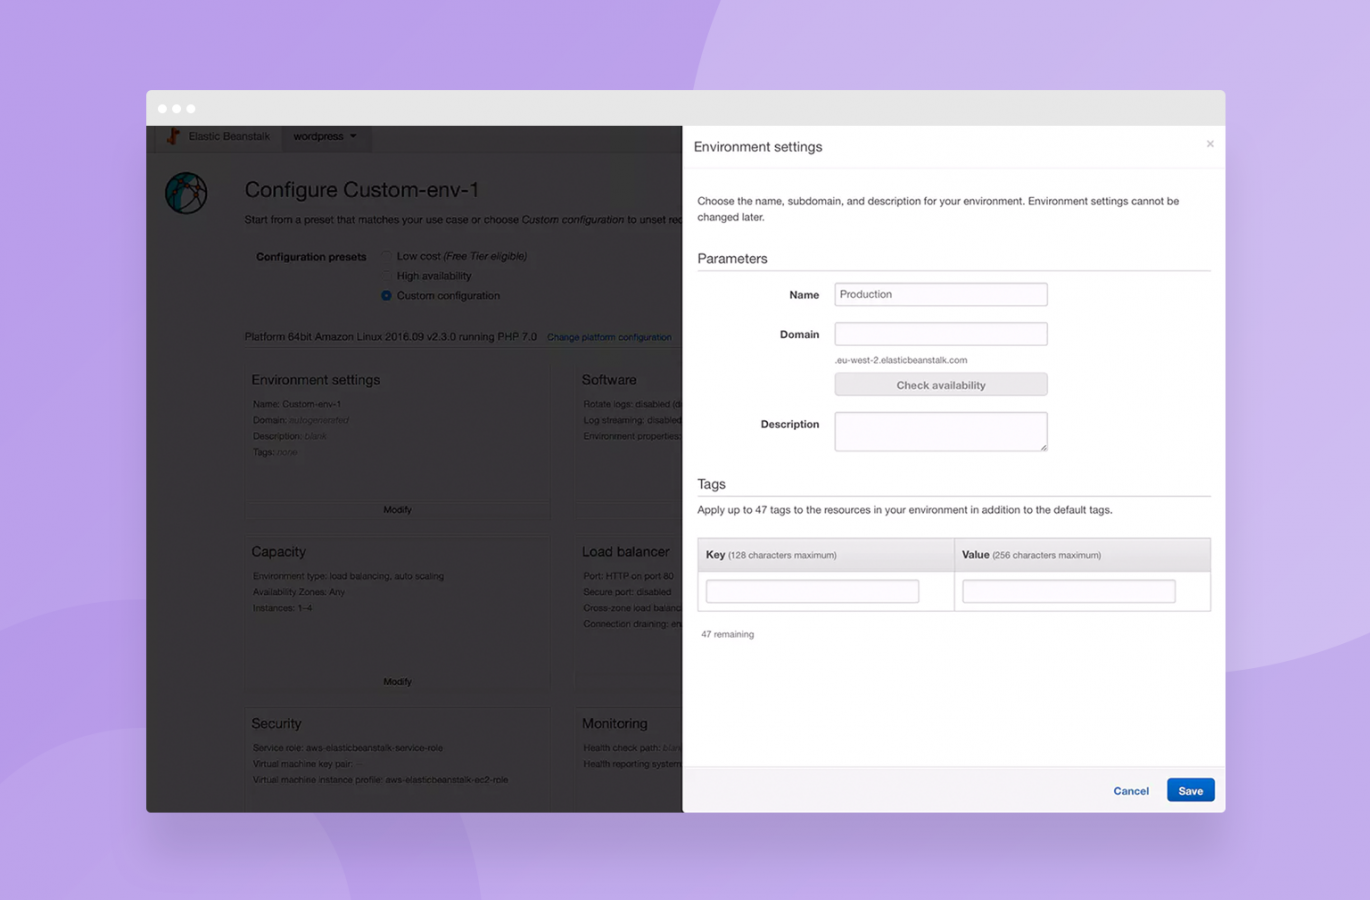
Once that’s saved, you can leave everything else as it is and go ahead and click the “Create environment” button down on the bottom-right.
AWS will go away and do your bidding for you now. It does take a while (maybe 5 minutes) to sort itself out so be patient. It might not look like it’s doing stuff but it is.
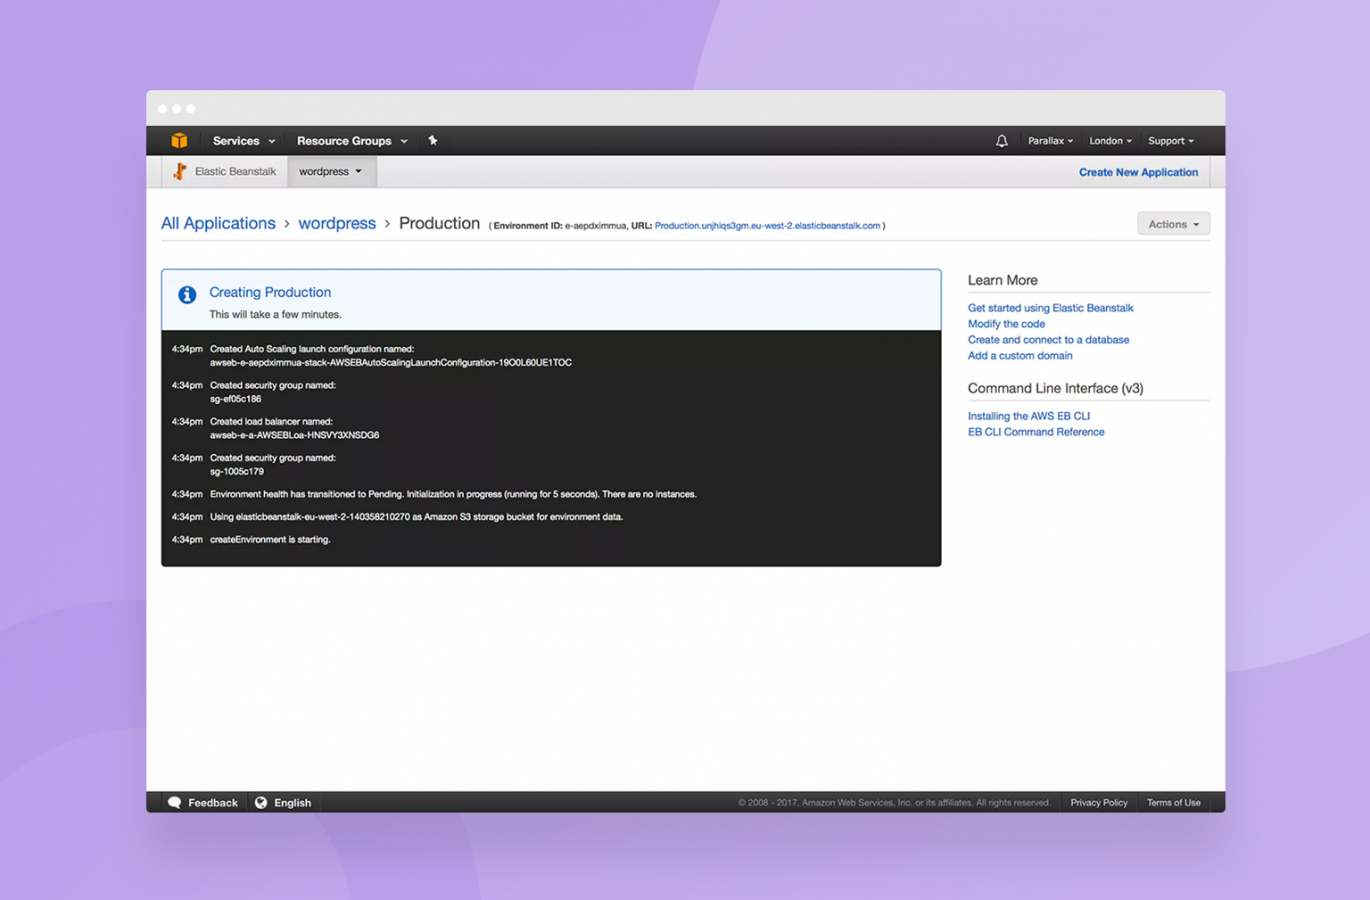
What have we just done?!
So, we clicked some buttons, AWS did some things. But what things?
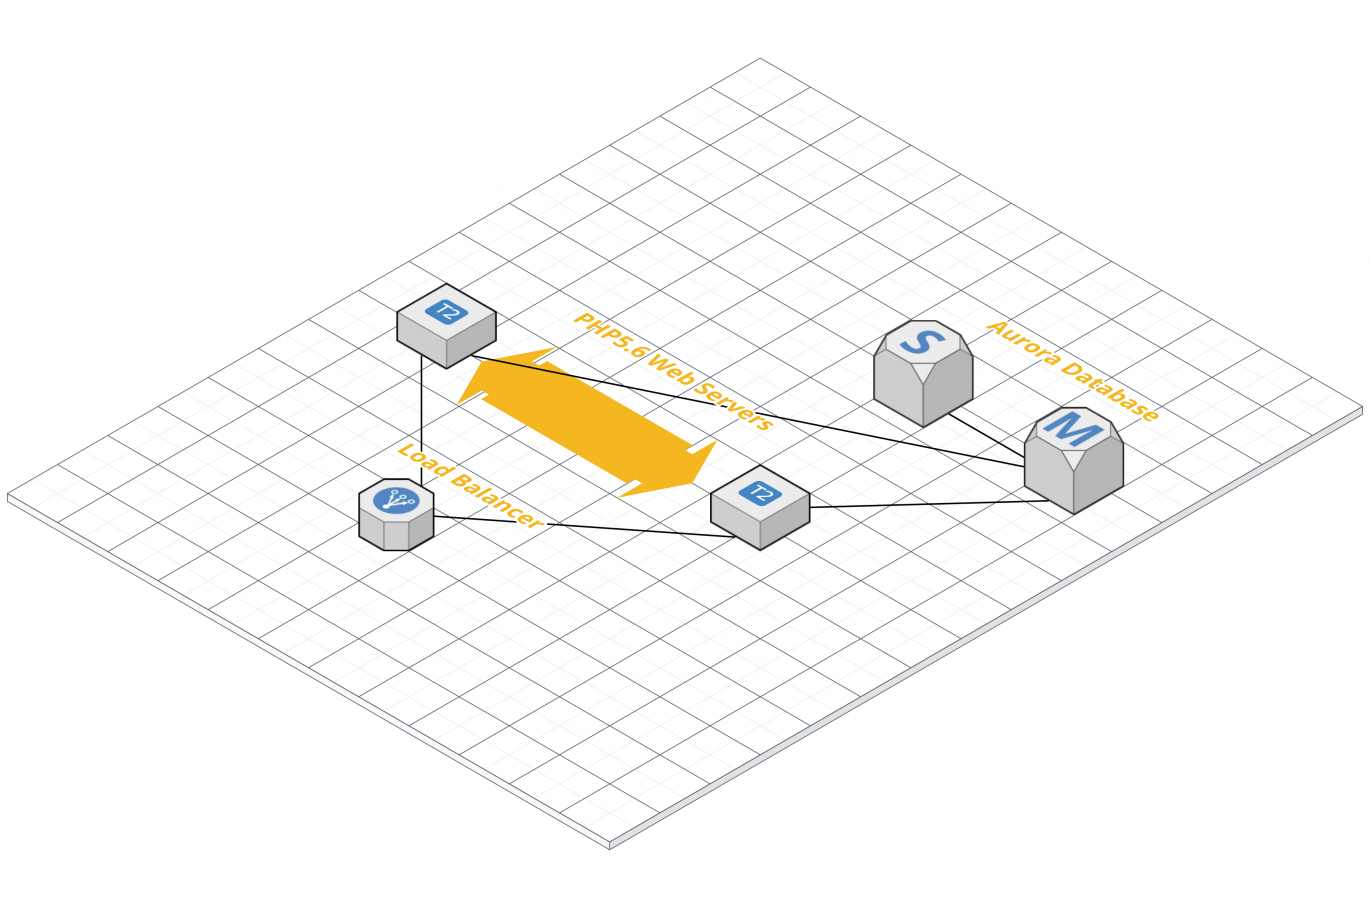
What we’ve just asked Elastic Beanstalk to do for us is to create the following Environment:
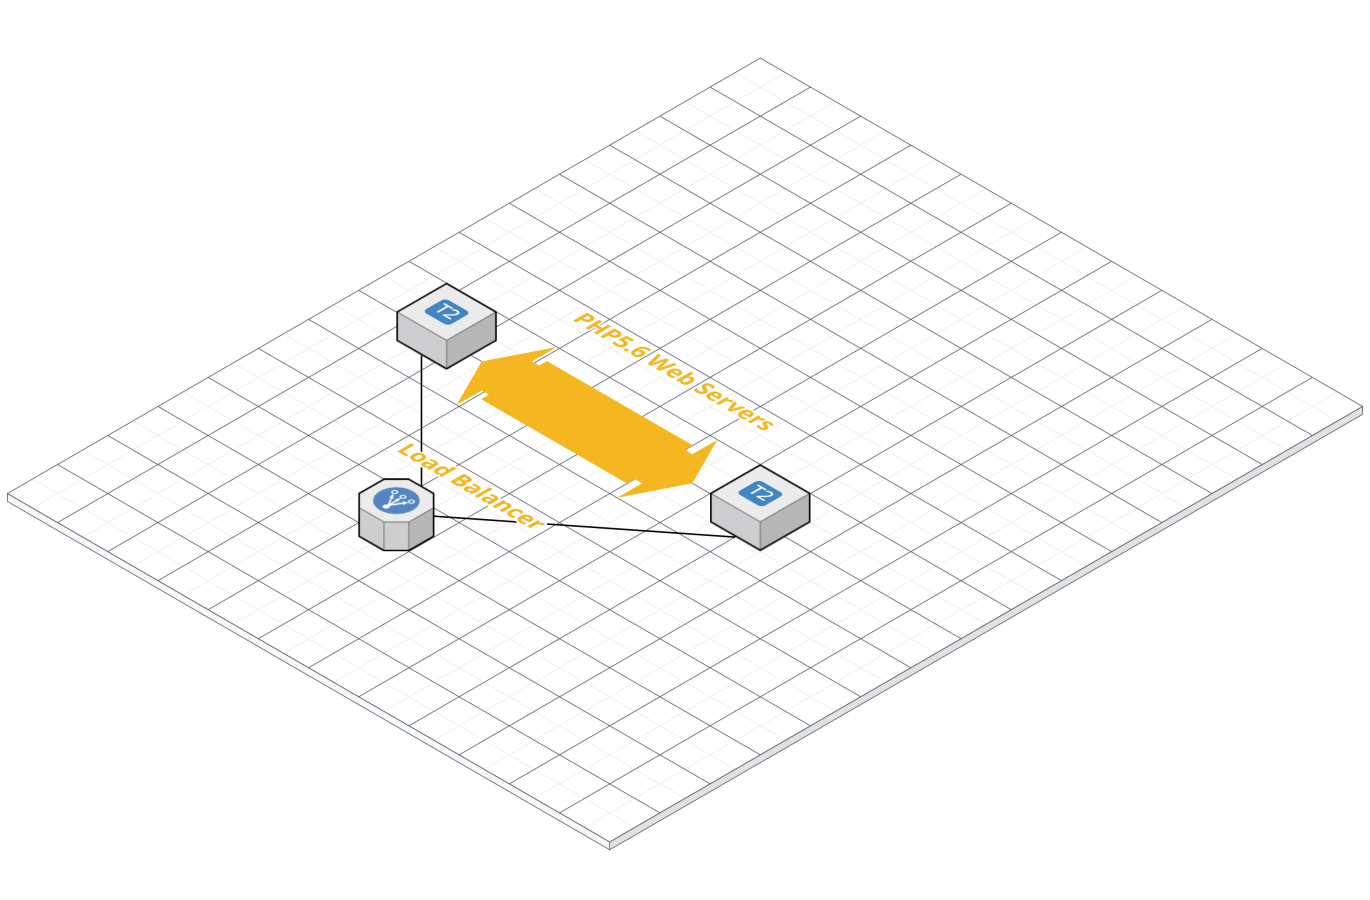
A picture tells a thousand… errr… nodes?!
What we’ve done is we’ve set up a load balanced, scalable web server tier. What does this mean?
There’s a load balancer at the “front”. That’s the bit that user’s browsers speak to when they want a web page. That load balancer then picks one of the PHP5.6 Web Servers sat behind it and asks one of them for the web page that the user requested. Once it’s got it, it then passes that back to the user’s browser.
Why is this good?
1. The load balancer is redundant, i.e. it can have bits of it break and people will still be able to use it.
2. The web servers behind it are also redundant. If one goes down, then the load balancer stops sending traffic to it.
3. The web servers can be scaled transparently, i.e. you could have two web servers as in the diagram above, or you could have 50. Who knows, maybe Justin Bieber wrote a guest blog post for you and it went viral or something.
Less downtime, more speed.
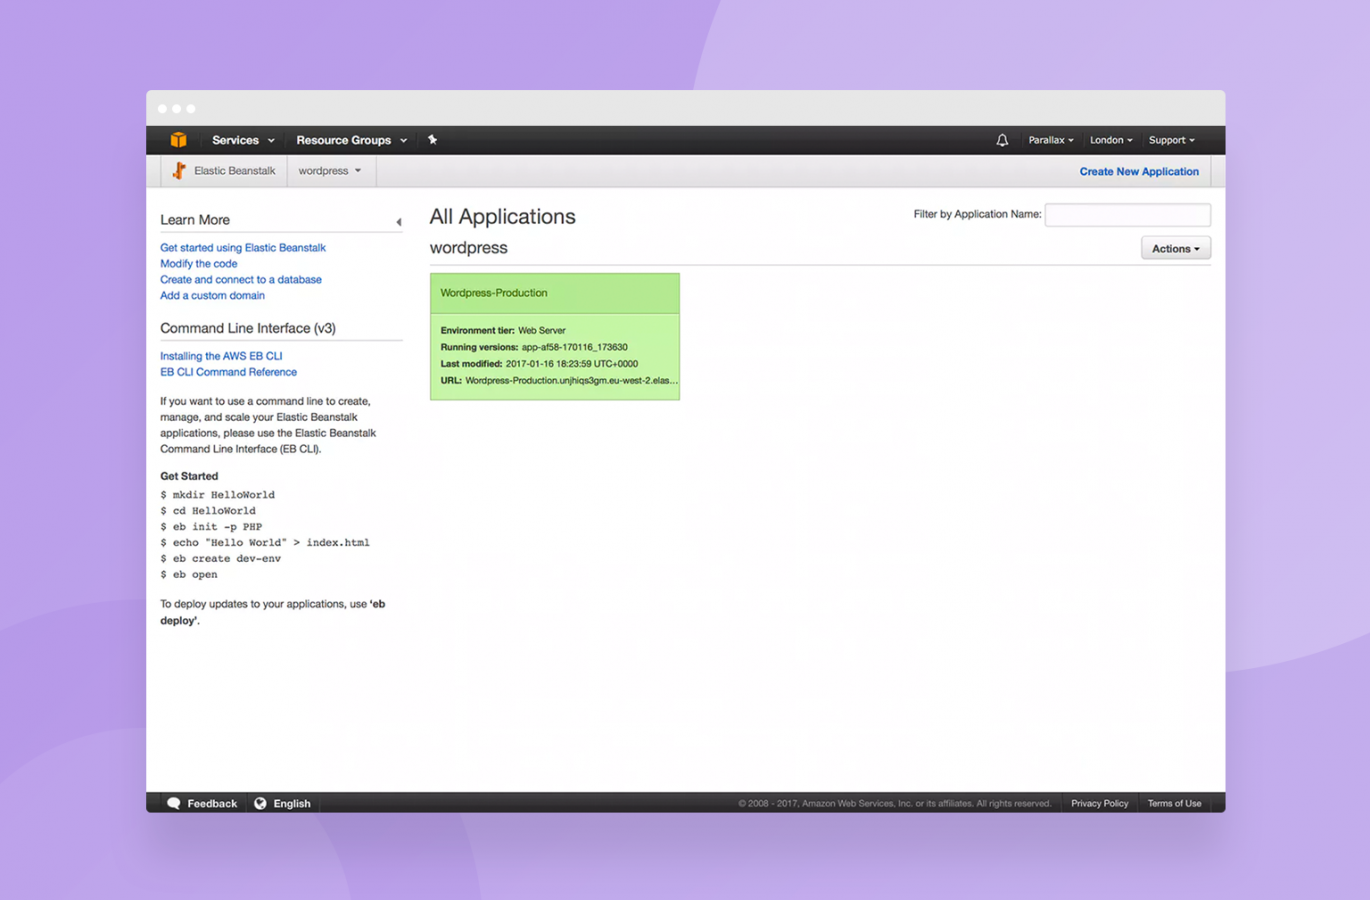
Accessing the environment
If you head back to your application (click “wordpress”) and then into your environment (once it turns green, meaning it’s all ready for you), you’ll notice that there’s a URL in Elastic Beanstalk:
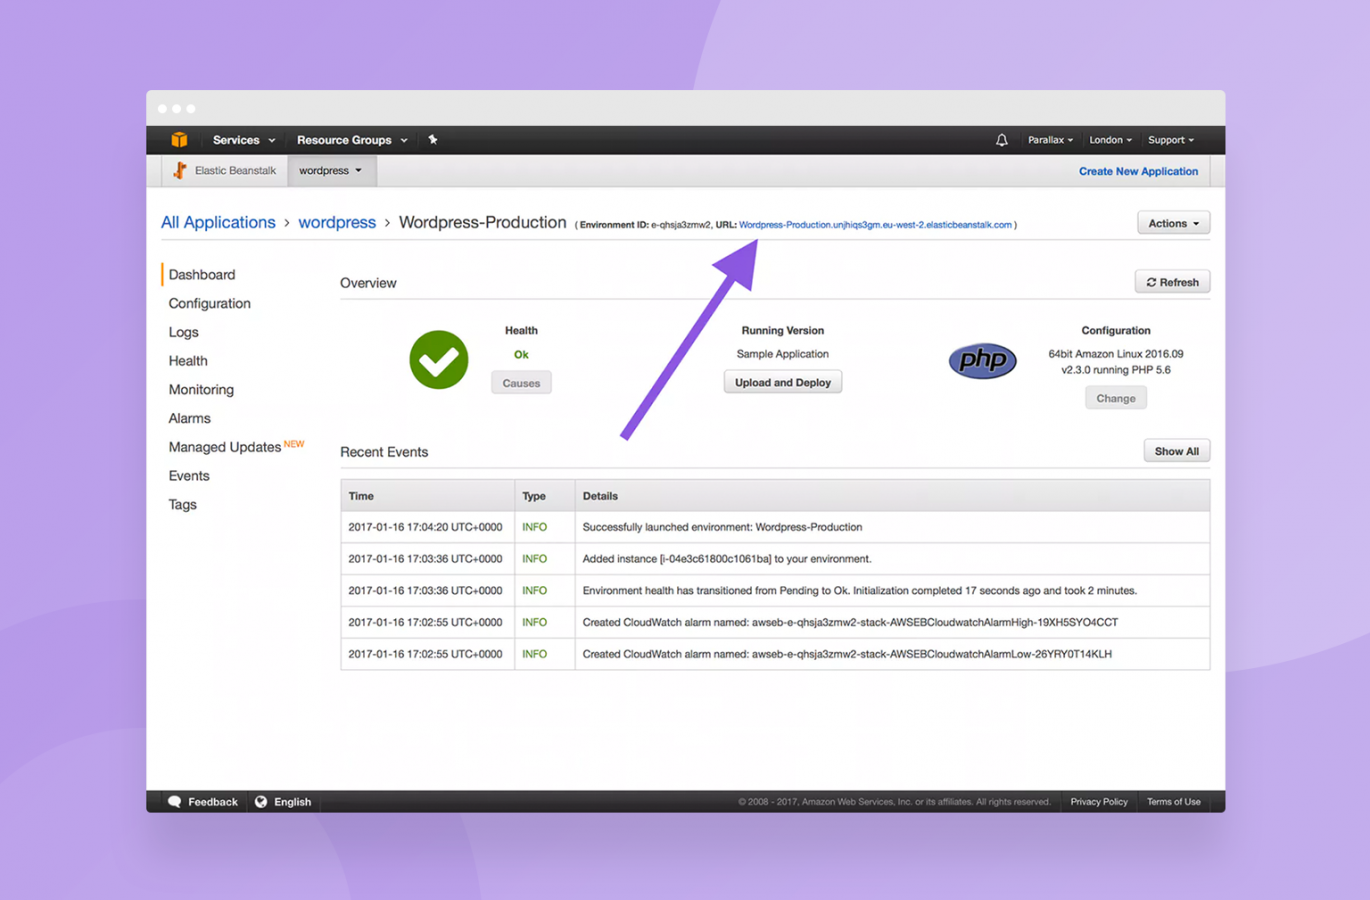
Clicking this link will show you the sample application we installed in this environment earlier (remember – our code isn’t in yet!):
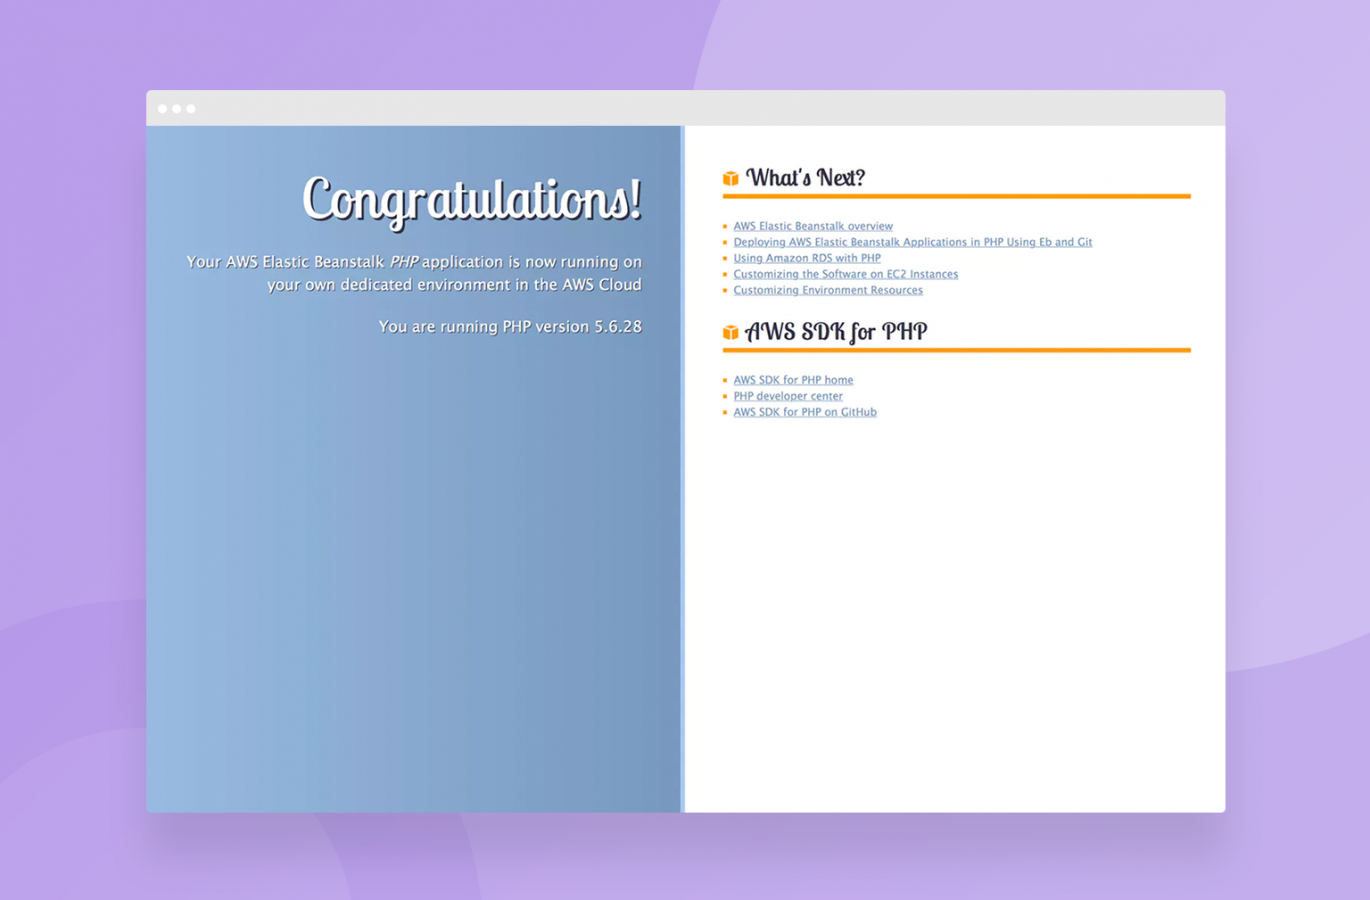
The page will tell you which version of PHP your environment is running. If it says 7.0, terminate the environment and create a new one and make sure you choose 5.6. You can have as many environments per application as you like which is useful for testing things before going live with them.
Step 4: Getting our code running
So we have an environment. But we don’t really want a page with “Congratulations” plastered on it. We want Wordpress!
To get Wordpress running here instead, we’re going to get our code running inside this environment.
Go back to your terminal and cd back to your project folder which, if you’ll remember, for me was the wordpress folder on my desktop:
cd ~/Desktop/wordpress
You’ll need to run:
eb init
This will then ask you which region you’re running your application in. This will be the same as the region in the top right of all of your AWS Console screens. For us, it’s London, so we’re going to go with region 15.
Access Keys
If you’ve never used EB before, you will see the following:
You have not yet set up your credentials or your credentials are incorrect
You must provide your credentials.
This is because the EB tool needs to know which Amazon account you want to deploy to.
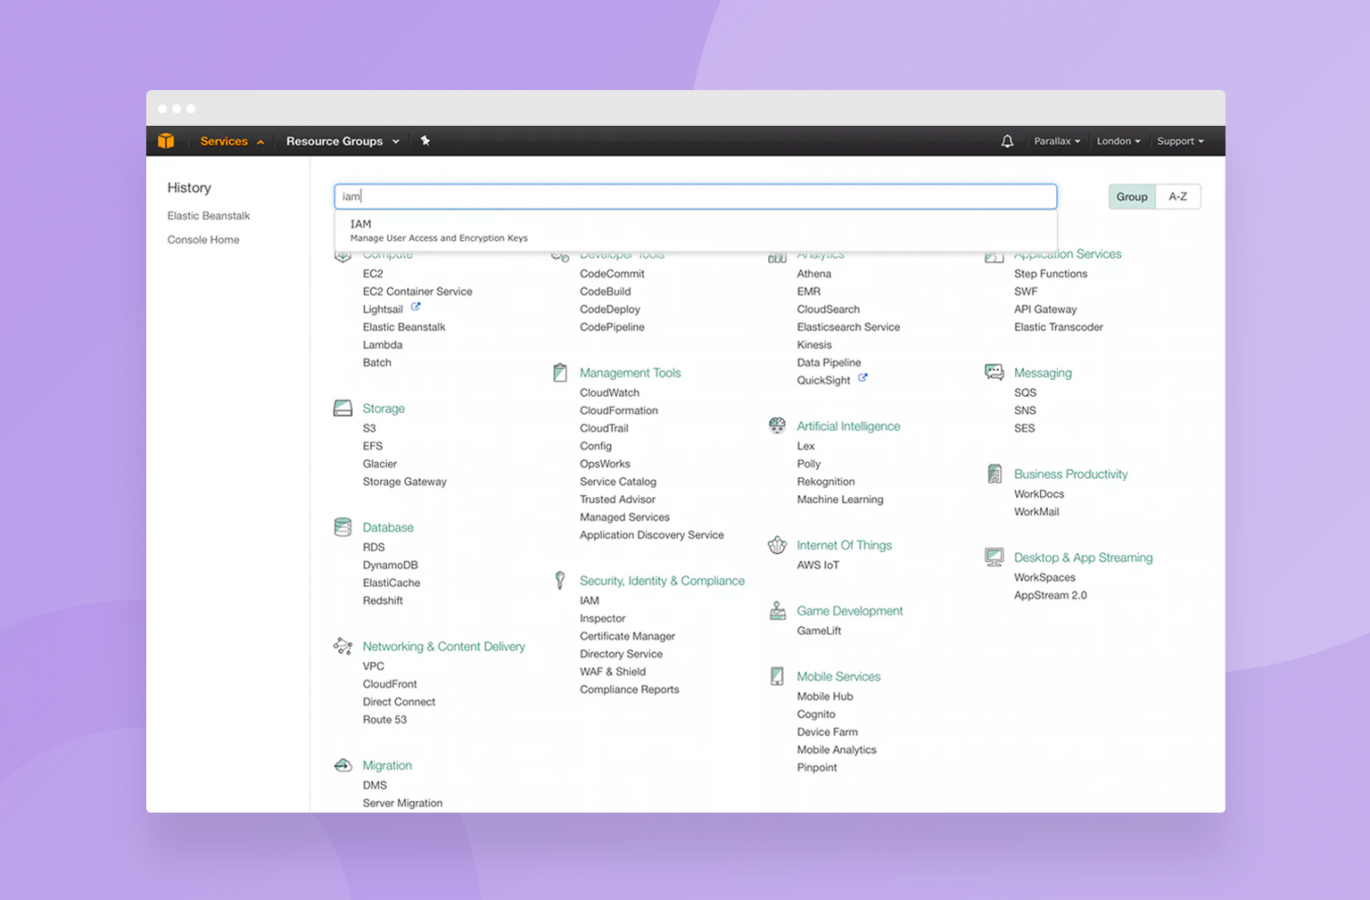
In the Amazon Console, open a tool called IAM:
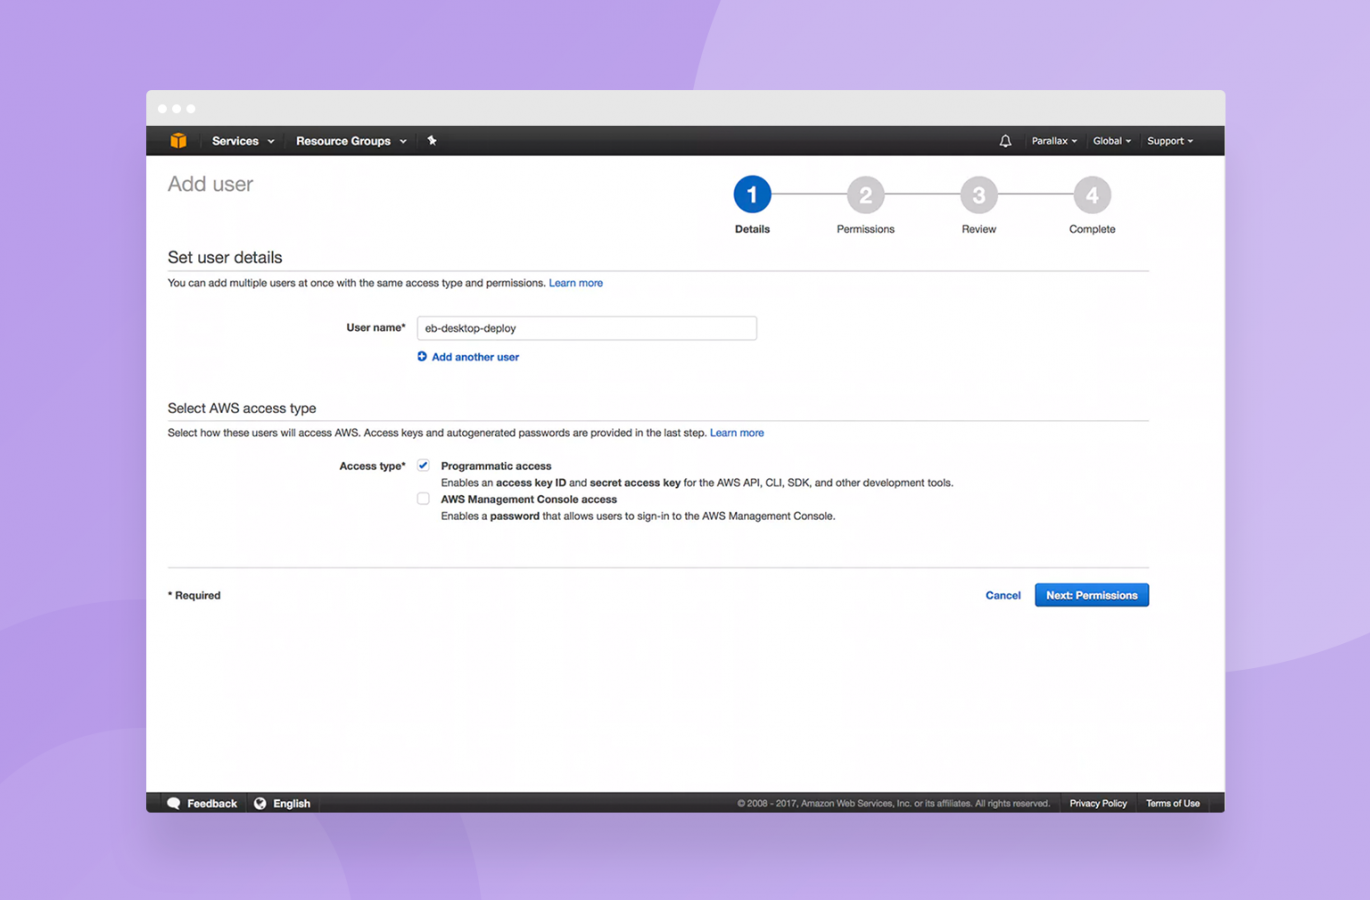
Once you have this open, select Users -> Add New User.
You’ll want to give this user a name – we’ve gone with “eb-desktop-deploy” and ticked “programmatic access”.
Click “Next: Permissions”
IAM is very powerful… and very complex. We’ve elected, for the sake of brevity, to go with attaching the PowerUserAccess policy in this instance. It’s not best practice (you should narrow down the permissions more than this, on a least-required basis) but it’s out of the scope of this tutorial to delve too deeply into how IAM works:
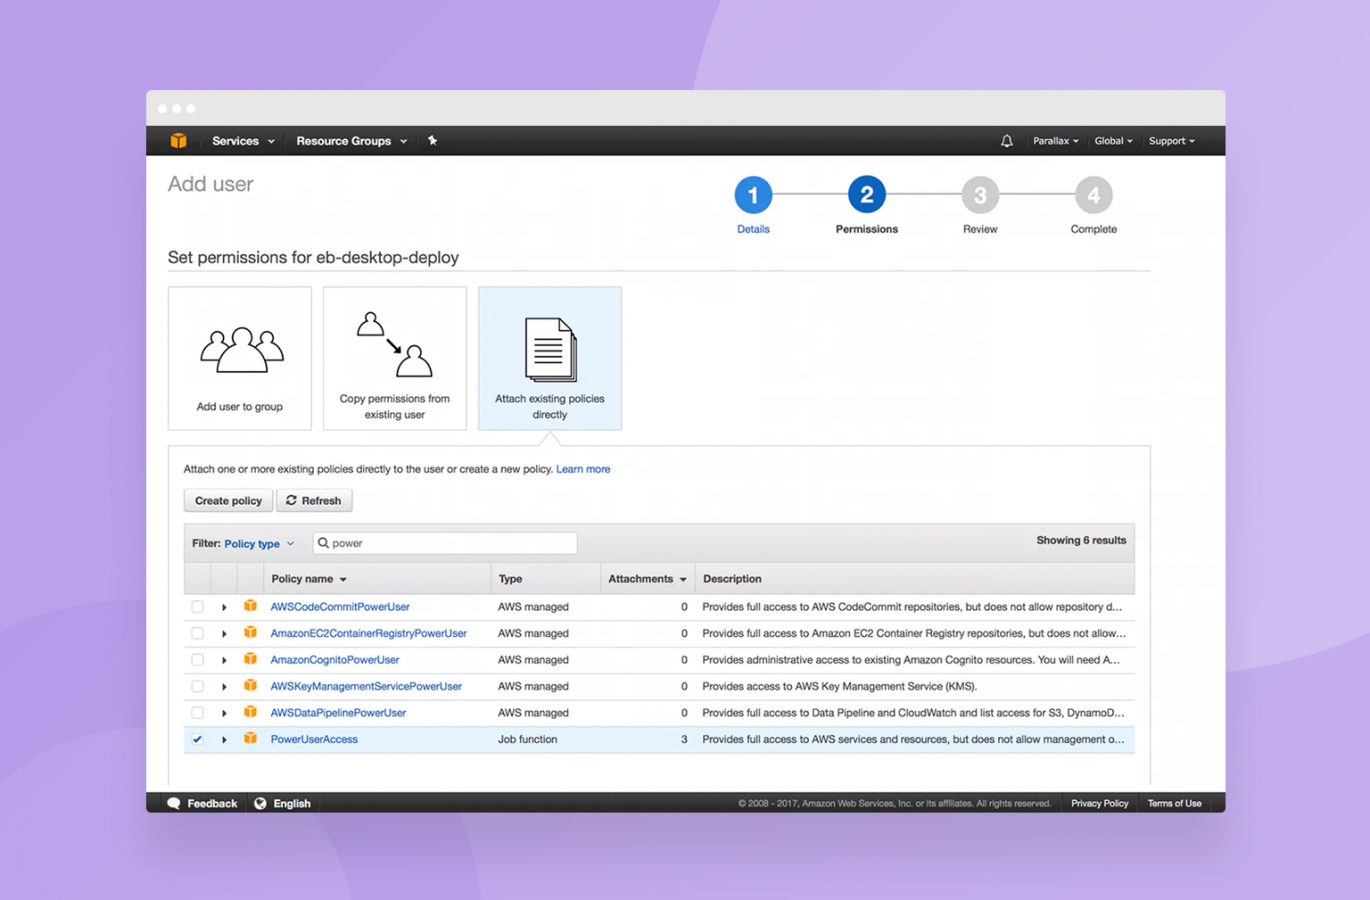
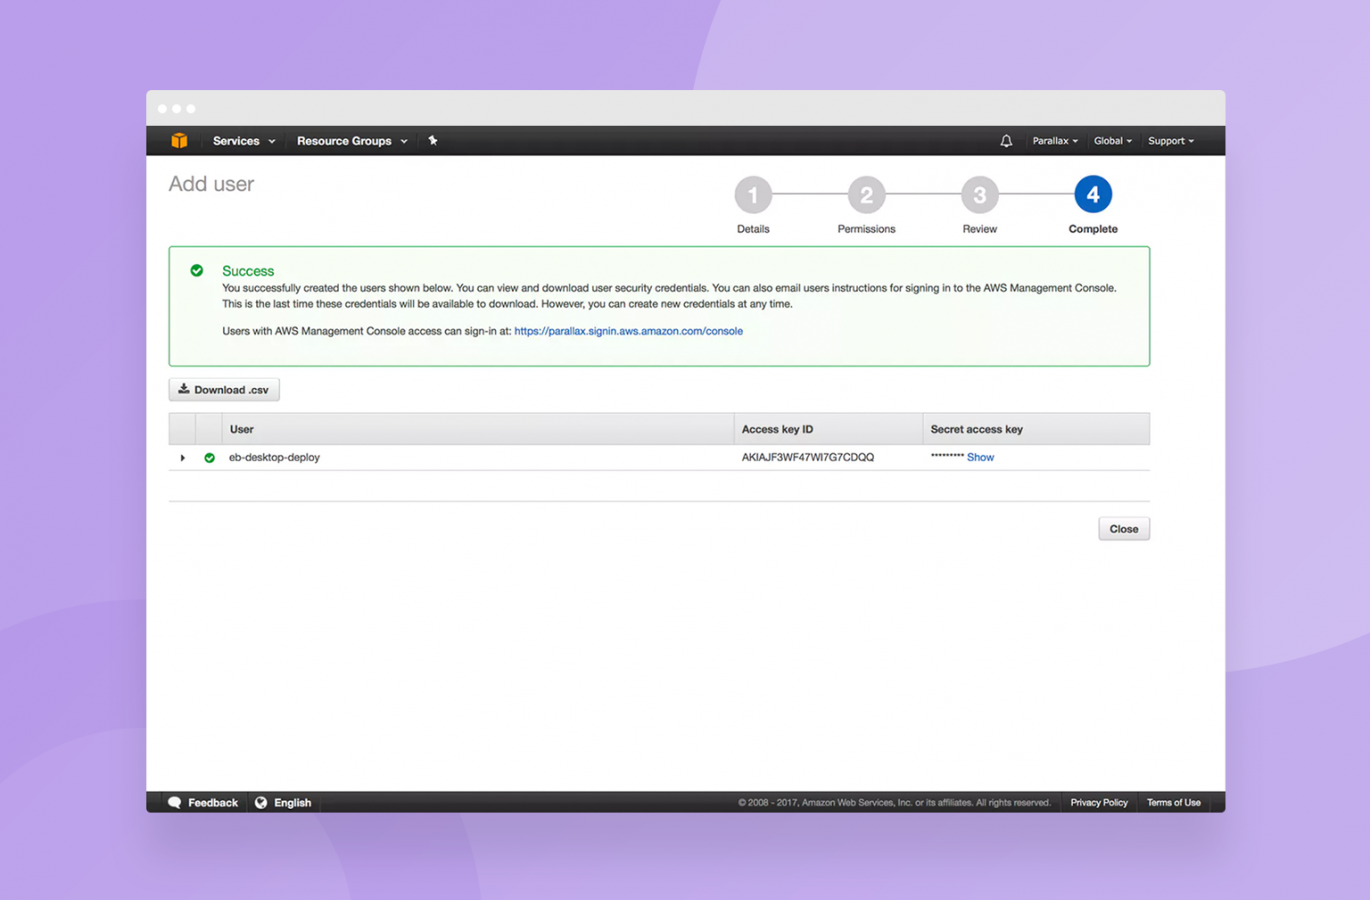
Click “Next: Review”, followed by “Create user”.
This will give you a screen with both your Access Key ID and Secret access key. You’ll want to copy these into the EB command-line tool we had open before.
Once complete and entered into the EB command-line interface, you should be asked which application to use. If you only have one, your option 1 should be “wordpress” or whatever you called your application when setting it up in the console.
Ours is called “wordpress” and is option 1, so we’re going with 1:
Select an application to use
1) wordpress
2) [ Create new Application ]
Once you’ve entered this, you should be back at the command prompt. You now have the Elastic Beanstalk command-line interface configured in a way that it knows which application this folder is, ready to upload your code.
Let’s deploy our code….
Ready? eb deploy
You’ll have to wait a while as it does it’s thing, but it should come back to you telling you what it’s doing. It’s taking your code, packaging it as a zip file, sending it to the servers in your EB environment and putting the code where it needs to be.
If you now visit the URL for your environment in Elastic Beanstalk, you should see the first setup screen of Wordpress:
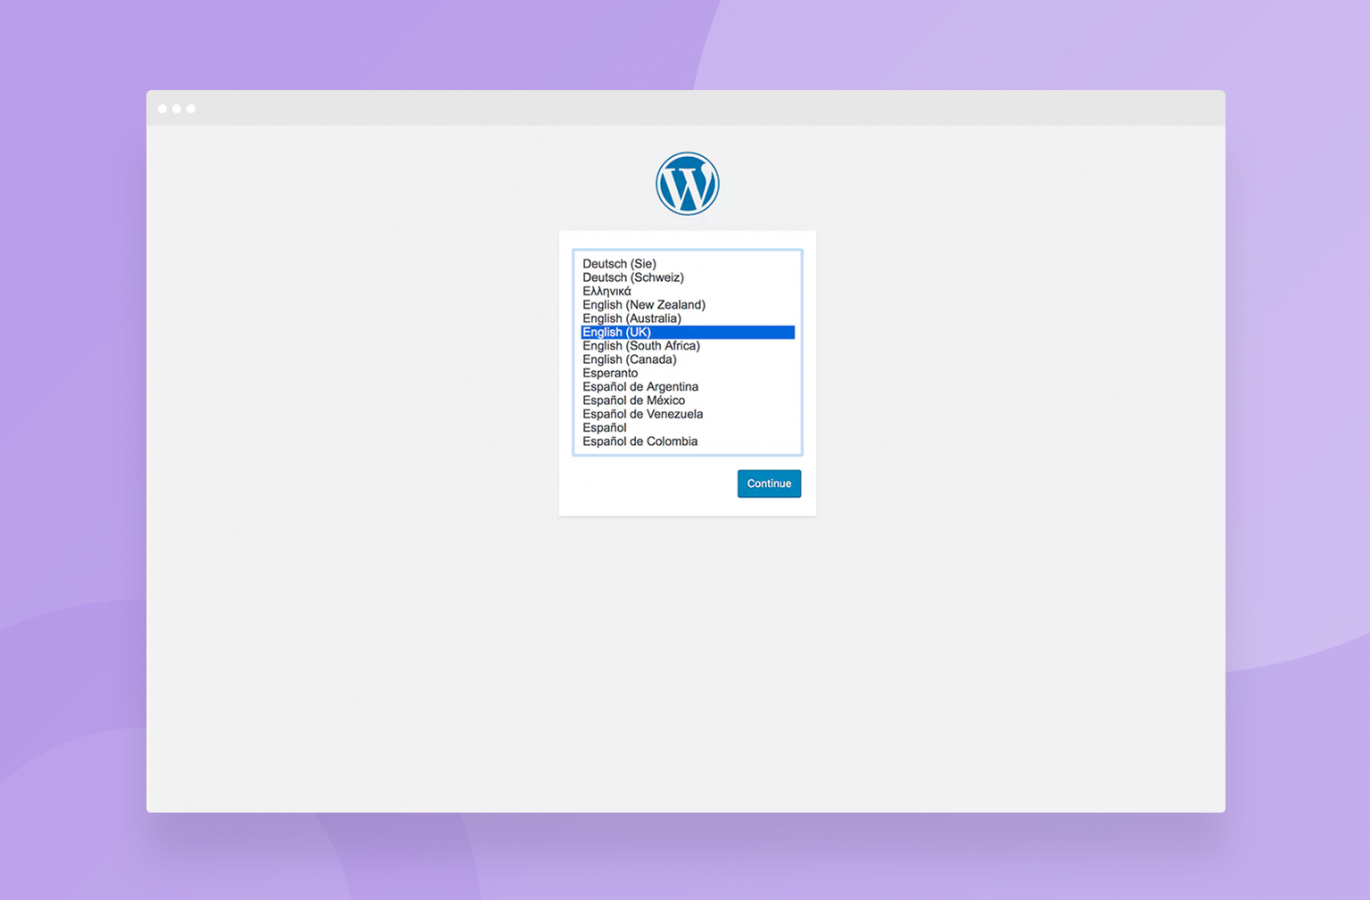
Because we don’t spell everything with a “Z” over here, we’re going with English (UK).
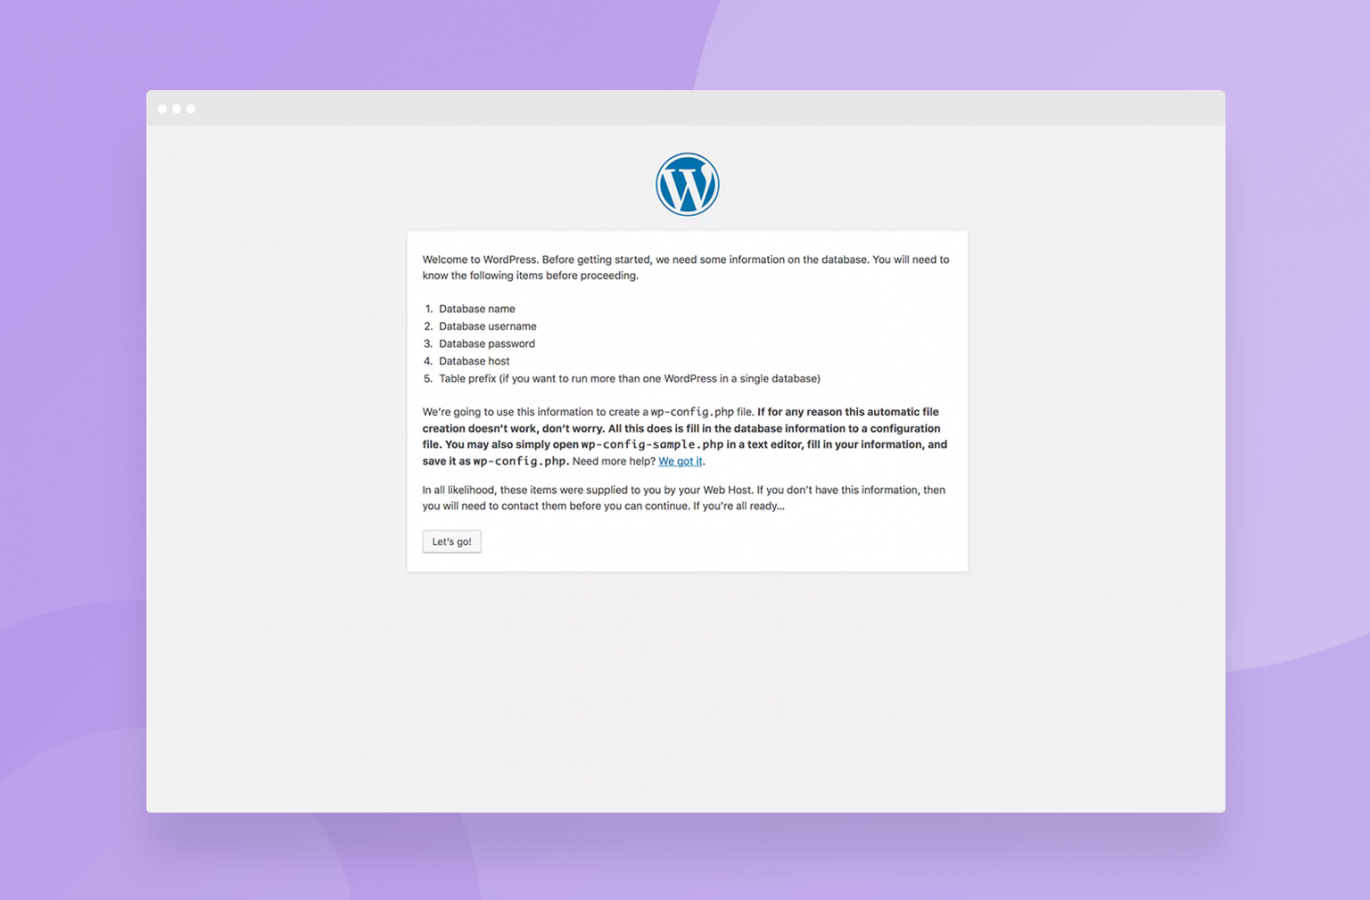
Right. Problem time.
Remember how we said not to create a database? Well… we didn’t. So we don’t know the database name, username, password, well, anything really, as it doesn’t actually exist yet.

Back to the AWS Console we go to create the database. The service we want here is called “RDS”, short for “Relational Database Service”:
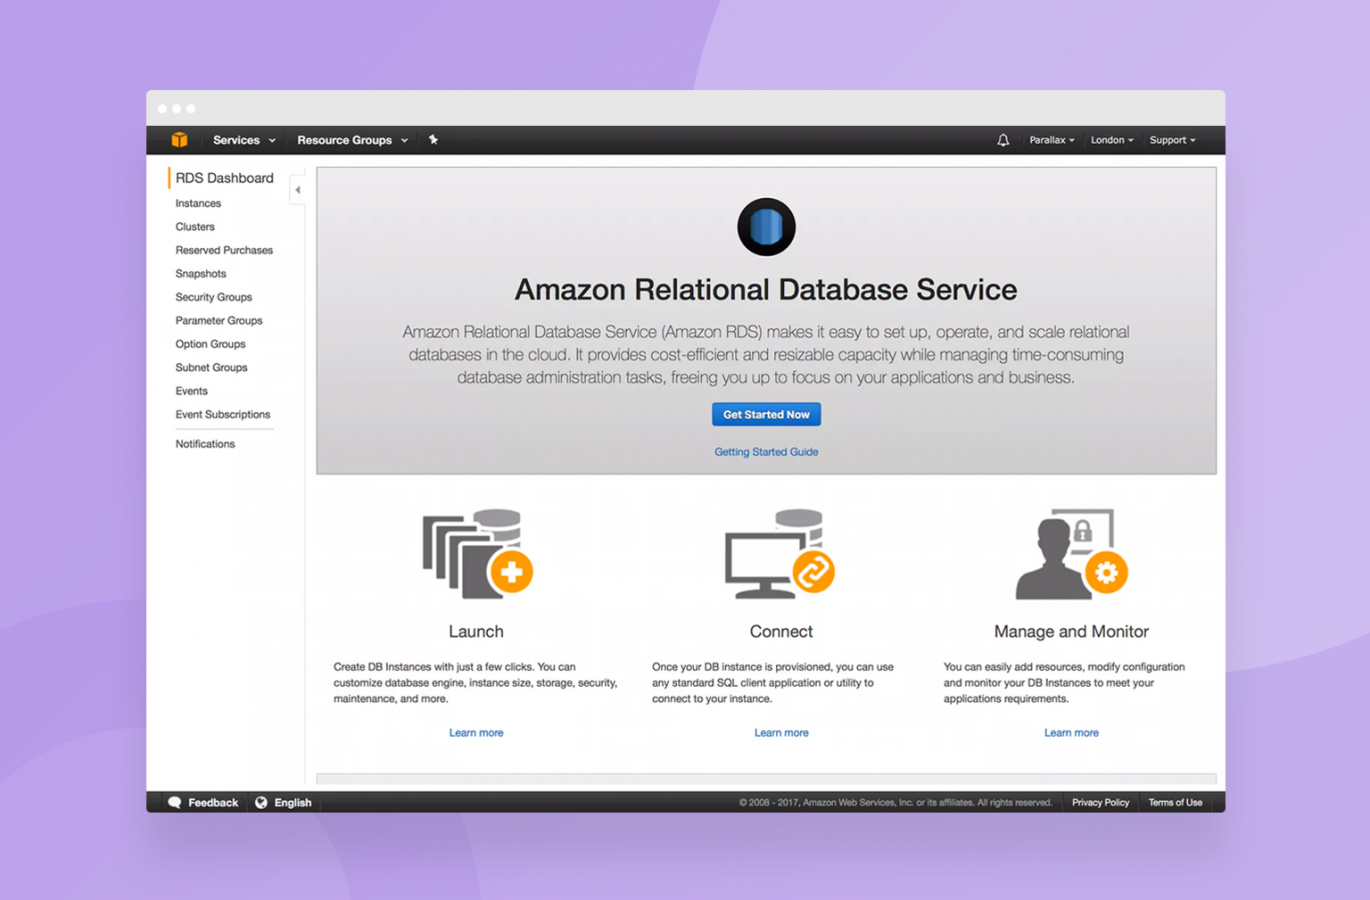
This time, the big blue button is, in fact, the one you want. Click “Get Started Now”.
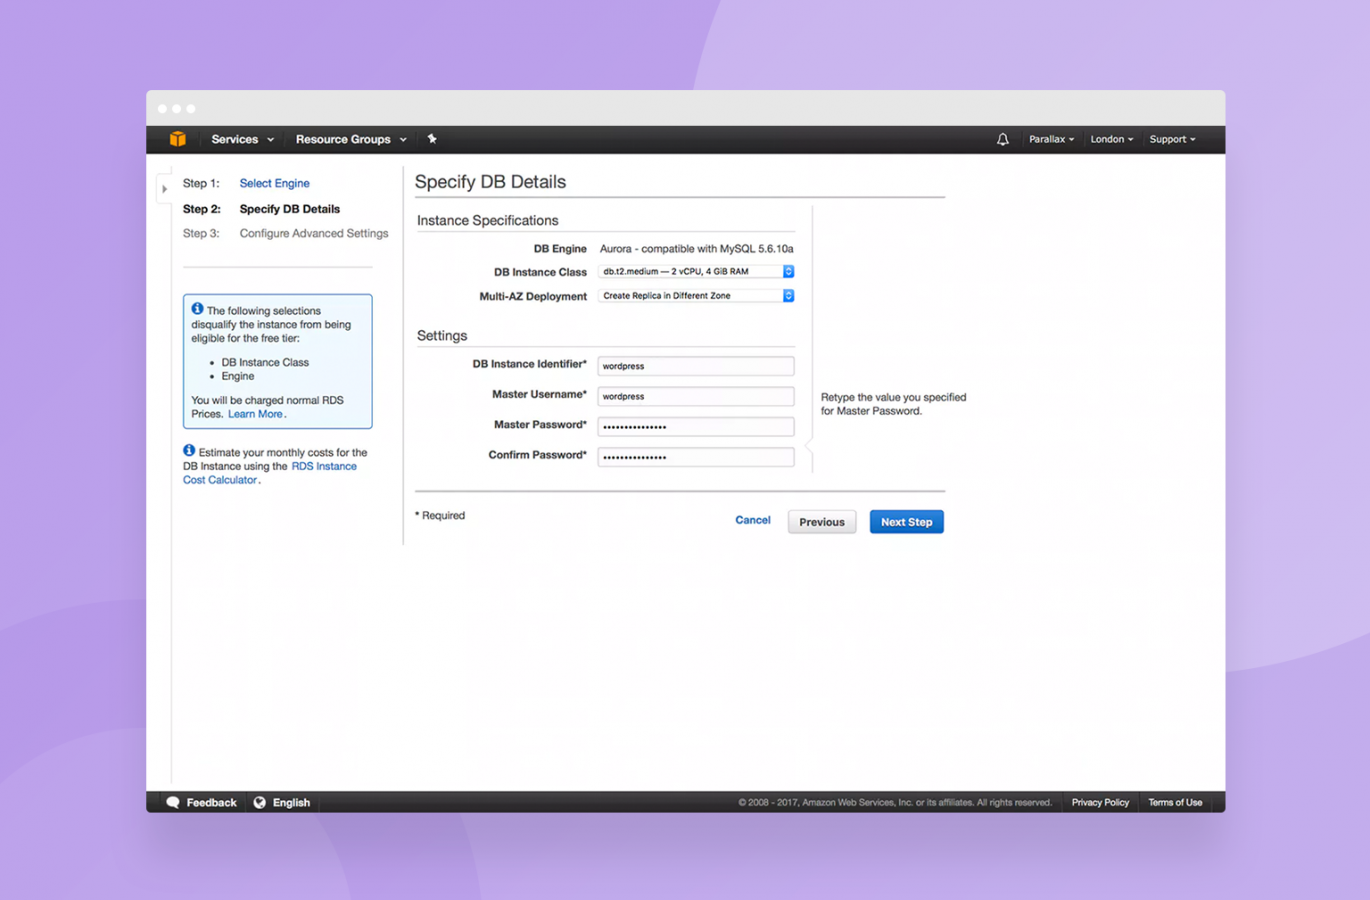
Select Aurora, then fill in the details necessary for the database. We’ve gone with a t2.medium instance size initially with multi-az deployment switched on.
This means there’s a master and a slave database node and they will failover to each other when necessary.
Be aware that the default size of database node, r3.large is quite expensive to run so if you do go with this option, make sure it’s actually what you’re wanting to do or you could end up with a fairly hefty bill.
Make sure you write down both the master username and password as you’ll need these shortly.
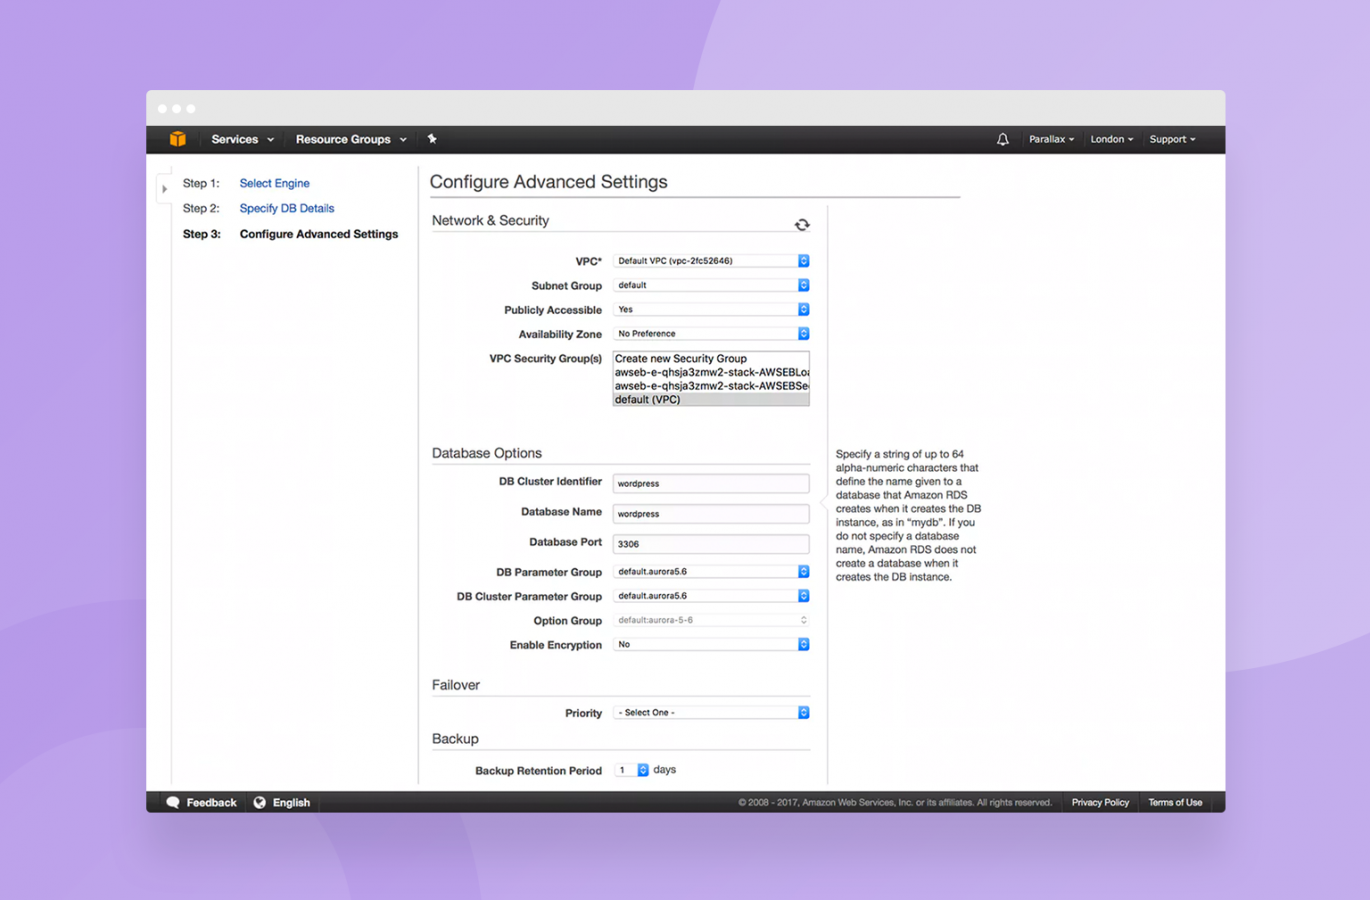
Choose the default VPC Security Group (again, best practice would suggest otherwise but is beyond the scope of this tutorial), the rest can remain as it is by default.
Click “Launch DB Instance”.
If you now click “Finish” and then “Instances”, you’ll see your instances are now being created (it’s Multi-AZ remember, so there’s two of them, although there’s only one actual database).
Wait until the instances are created. This takes quite a while so you might want to get a coffee.
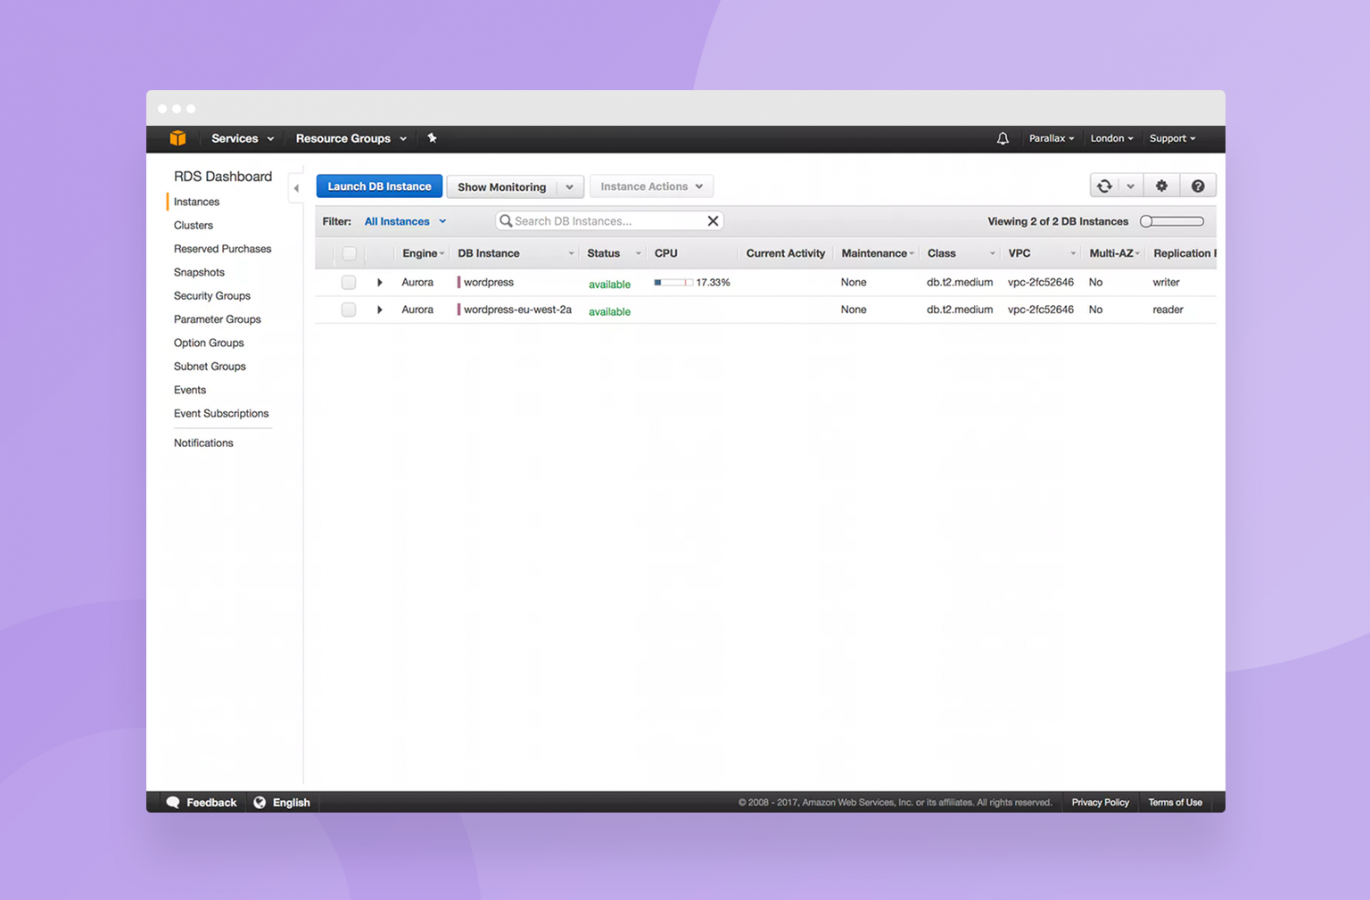
We did say it takes a while… This is what it looks like when you finally get there.
Click the little disclosure arrow on the top one, the one called “wordpress” not “wordpress-eu-west-2a”:
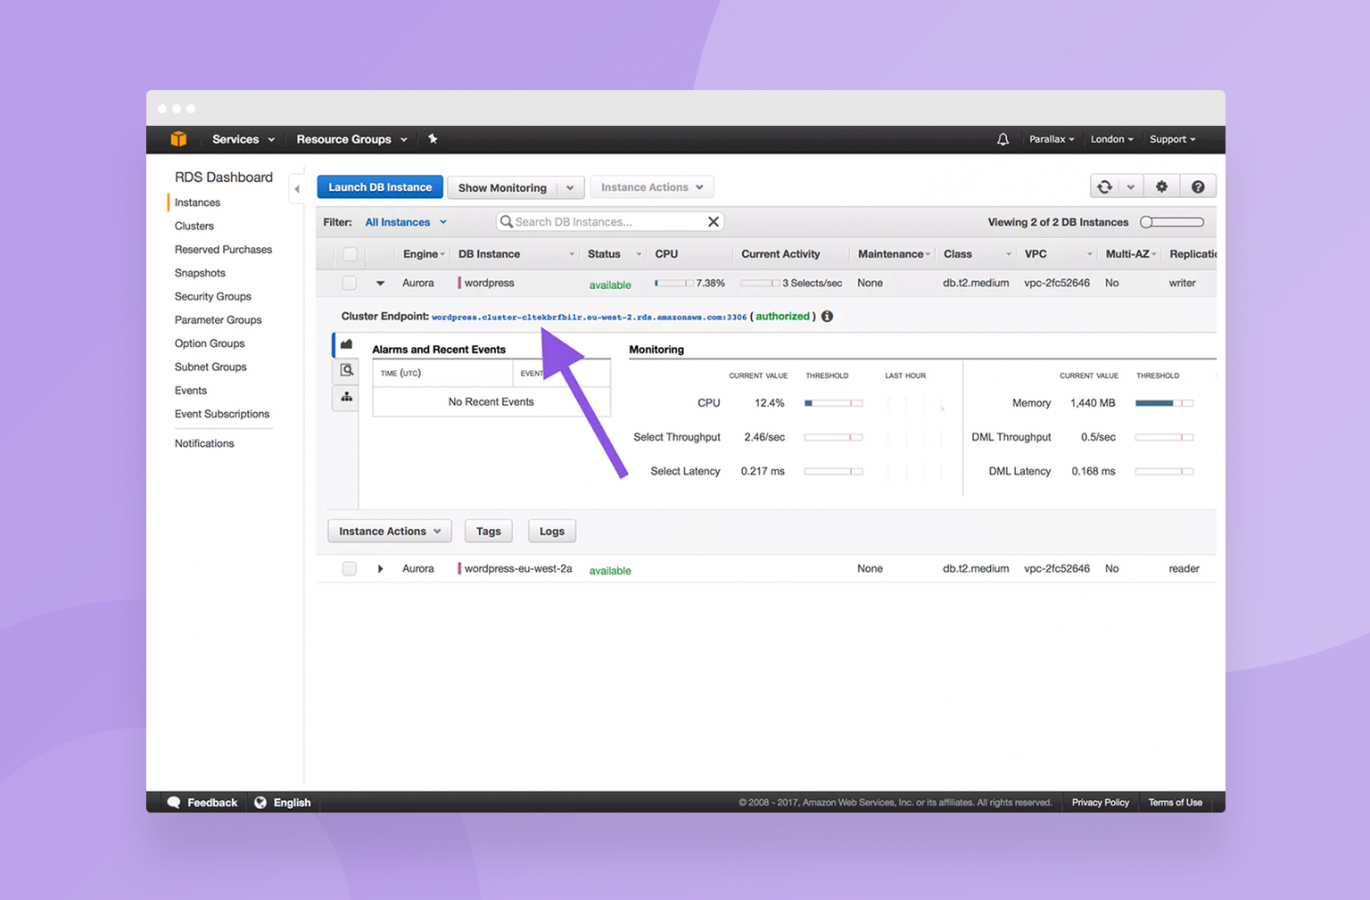
Copy-paste this and put it in the same place as you put the database username and password. You now have enough information to complete the Wordpress setup.
Before we get to that, we need to ensure that our web servers in our Elastic Beanstalk setup can speak to our database server.
To do so, open the “VPC” service in the AWS Console and select “Security Groups” on the left and select the one with a group name of “default”:
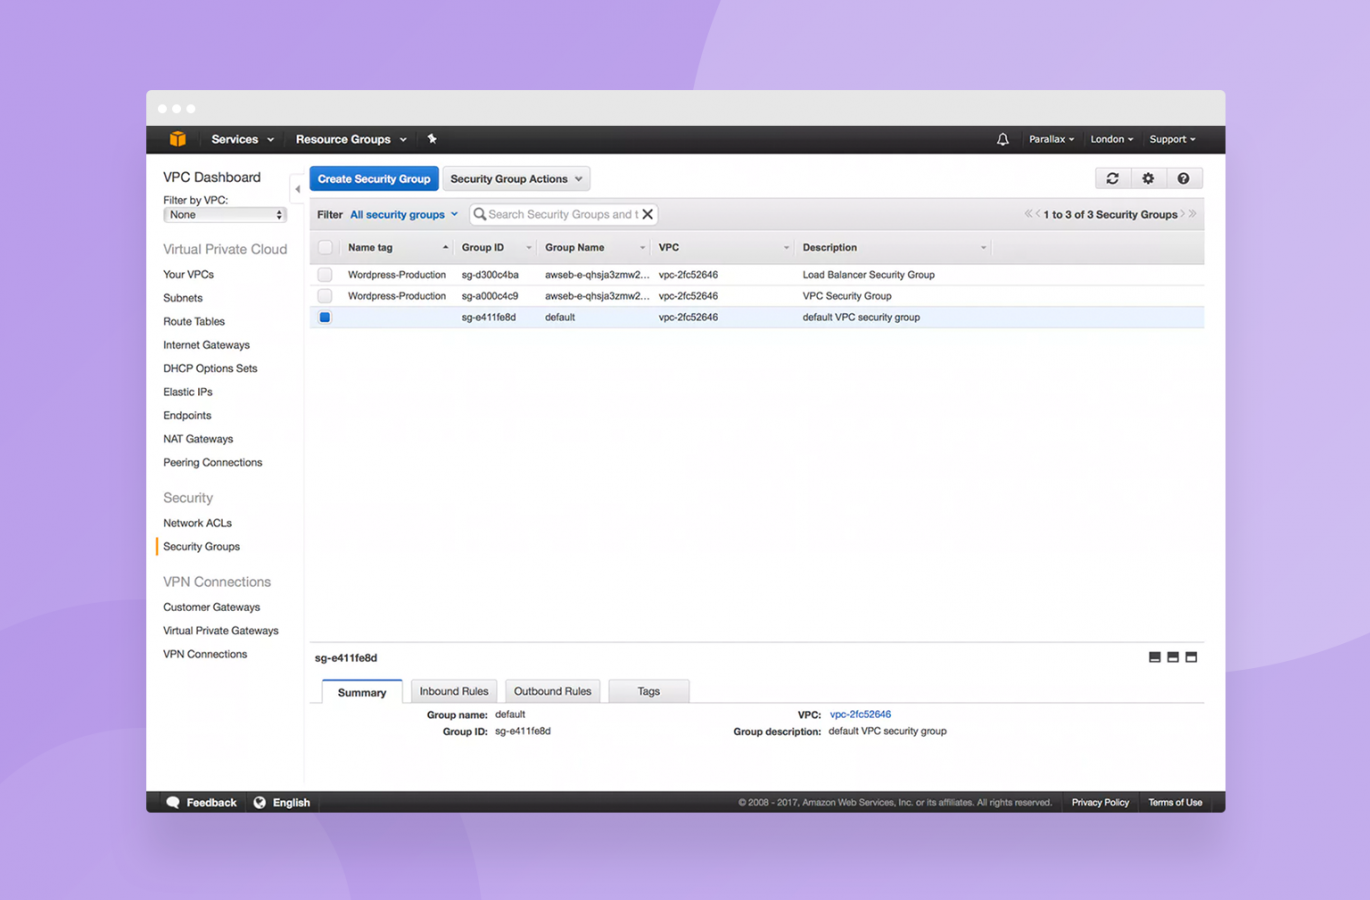
Open inbound rules, add a rule as type “MYSQL/Aurora” and select the source to be the same group id as your default rule.
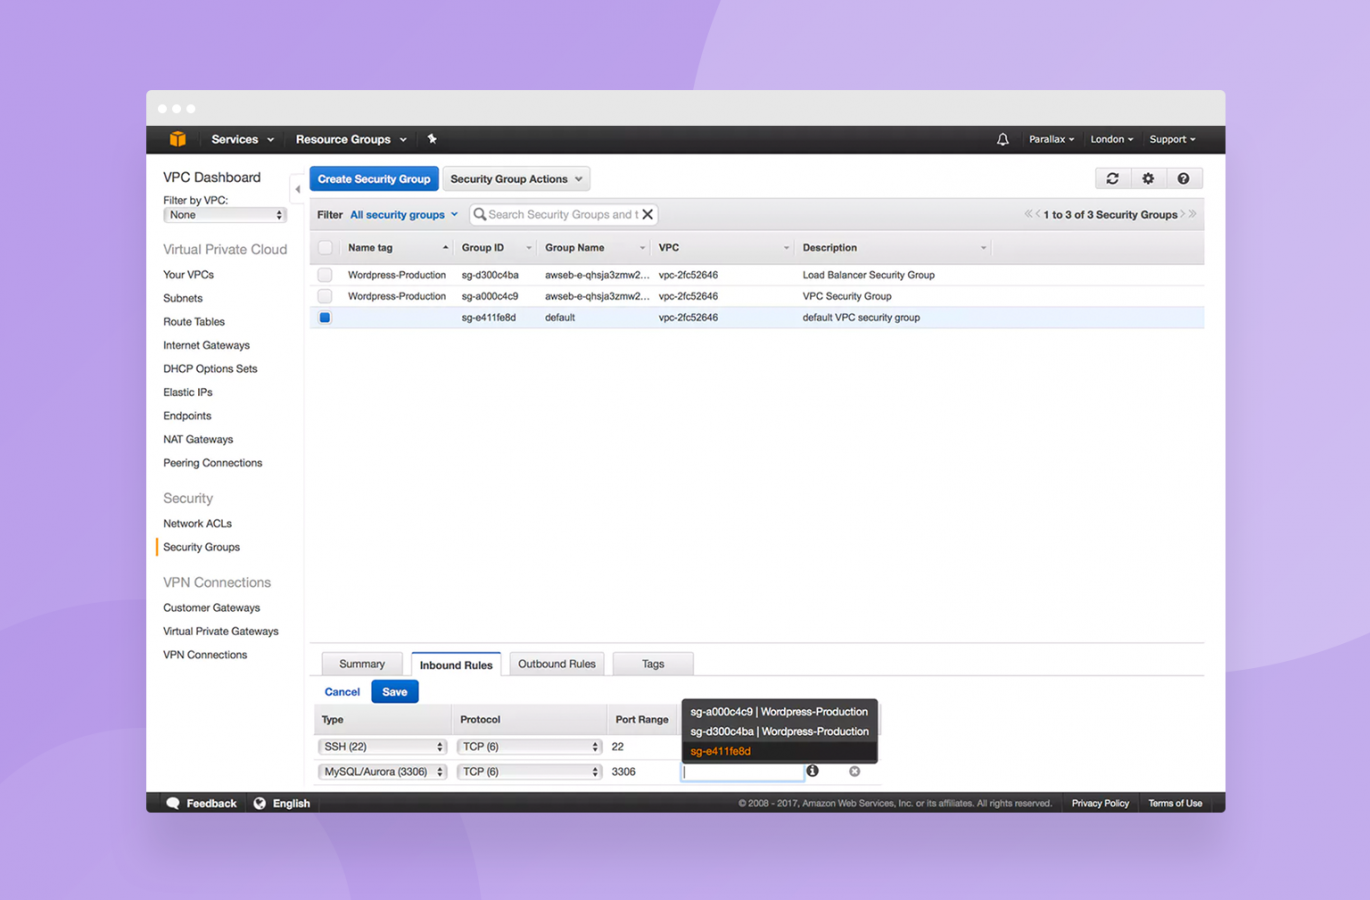
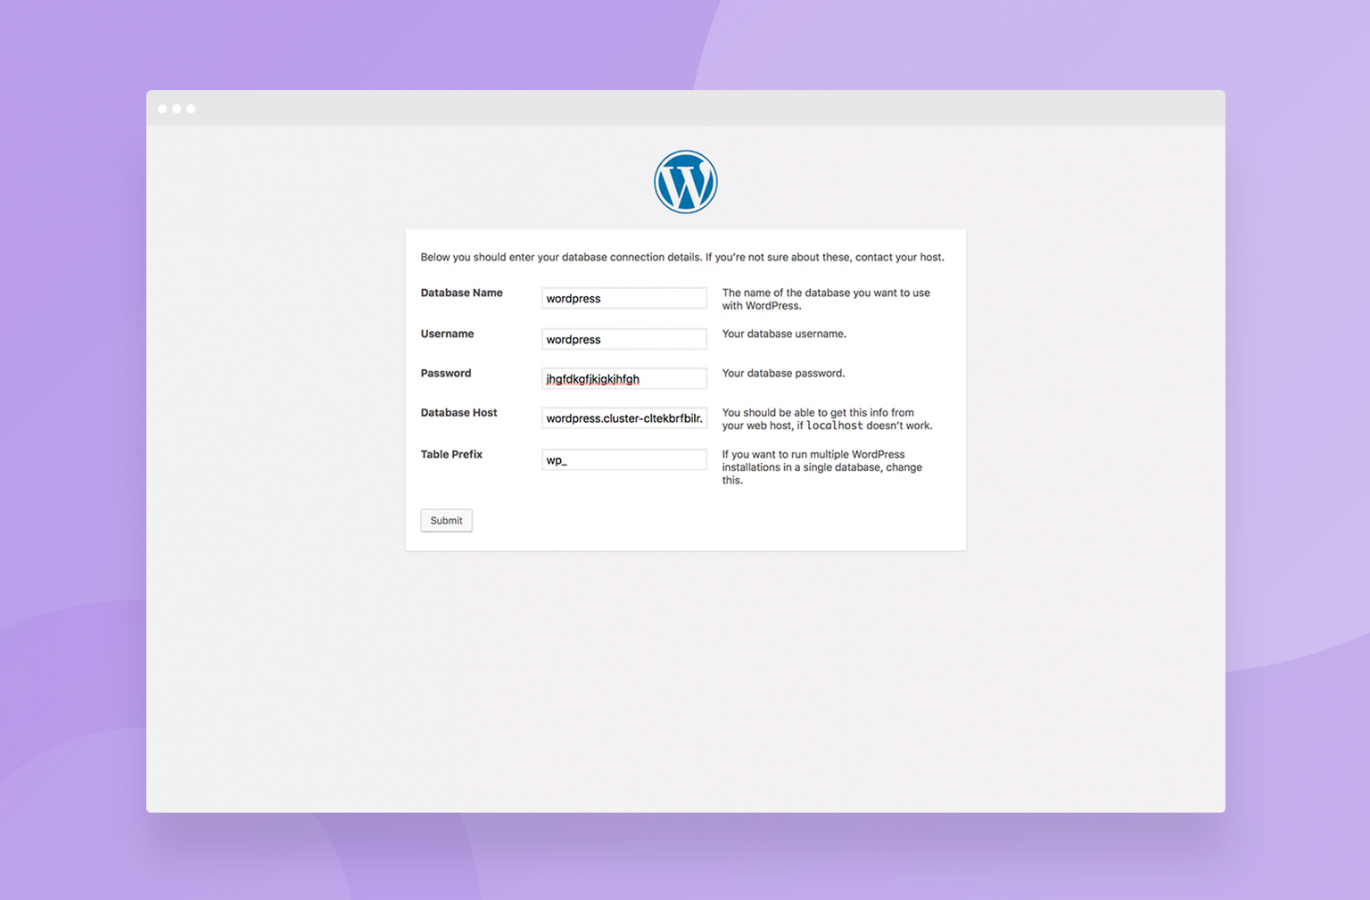
Hit save, then go back to your Wordpress installer page and input the database credentials and click “Submit”.

Note that you don’t need the :3306 on the end of the cluster endpoint you copy-pasted from RDS. Just the hostname is fine.
If everything is fine with your database settings, you should see the following:
Hmmm… “Sparky”. That’s what we call electricians in the North of England. Click “Run the install”.
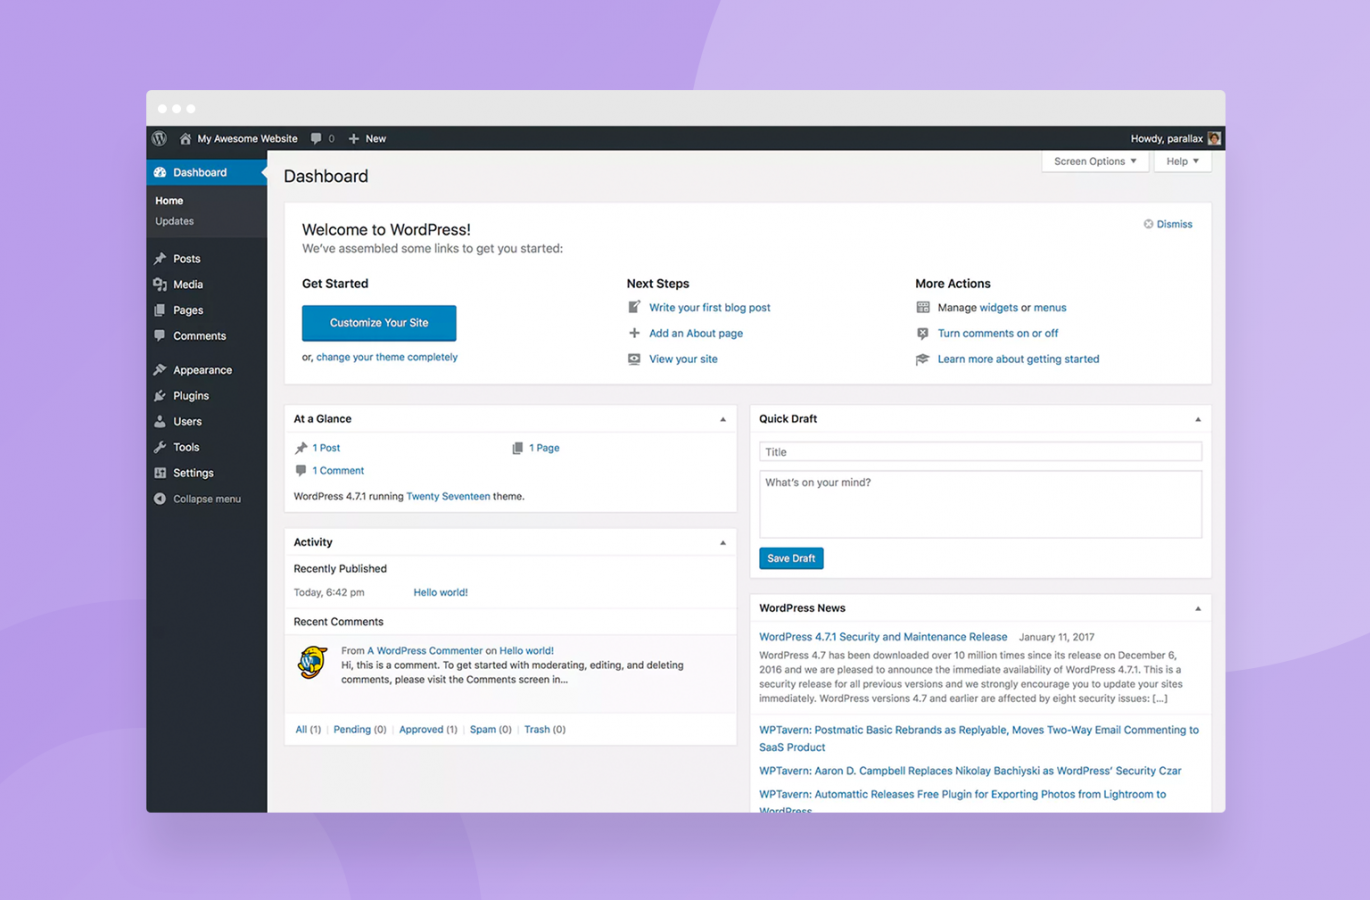
You should end up with the last Wordpress setup screen:
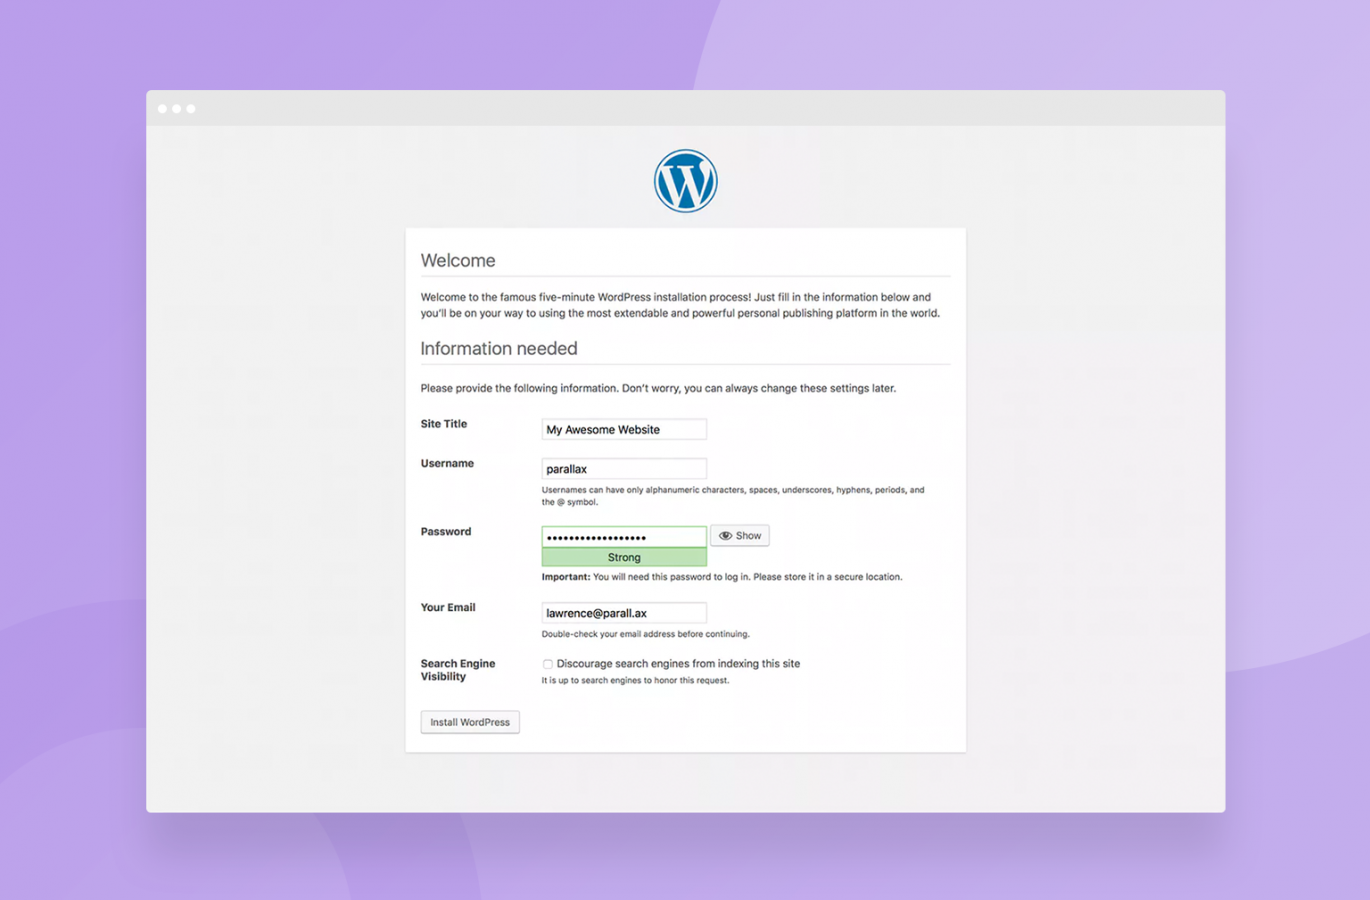
Followed by (drumroll please) the Wordpress administration dashboard:
This is what our architecture diagram looks like now. We have separated out the load balancer, web servers and now the master and slave database servers and the entire system has redundancy built into it:
Step 5: Storage Persistence
If you wait a little bit it’s all going to break
Now you’re going to be feeling great about yourself, running around the office, everyone’s looking at you like you’re some kind of super-hero. At least until you try and scale your shiny new Wordpress install or reconfigure anything and it all comes horribly crashing down.
Why would it do that?
When we installed Wordpress, the installer wrote a file to disk called “wp-config.php”. It wrote it to the disk of the server that the site is currently running on. Currently as in right now.
If that server were to be replaced, that file would no longer be there, because it will only install the files that we pushed up to Elastic Beanstalk using eb deploy. And that would be bad.
The solution, then, is to commit our wp-config.php file to Elastic Beanstalk so that file is always there when we need it.
Committing passwords in config files in your source code is almost universally considered bad practice, so we’re going to use something called “Environment Variables” instead. They’re essentially placeholders for something that’s stored elsewhere.
Let’s have a look at the bits of our wp-config.php file relating to the database that were created by the installer:
// ** MySQL settings - You can get this info from your web host ** //
/** The name of the database for WordPress */
define('DB_NAME', 'wordpress');
/** MySQL database username */
define('DB_USER', 'wordpress');
/** MySQL database password */
define('DB_PASSWORD', 'awesome_db_password');
/** MySQL hostname */
define('DB_HOST', 'wordpress.cluster-cltekbrfbilr.eu-west-2.rds.amazonaws.com');
We’re going to set environment variables in Elastic Beanstalk for these so that the code doesn’t have to directly contain the details (and could actually be reusable across multiple Wordpress installs).
First, open the Elastic Beanstalk console:
Then open your environment and click “Configuration” on the left:
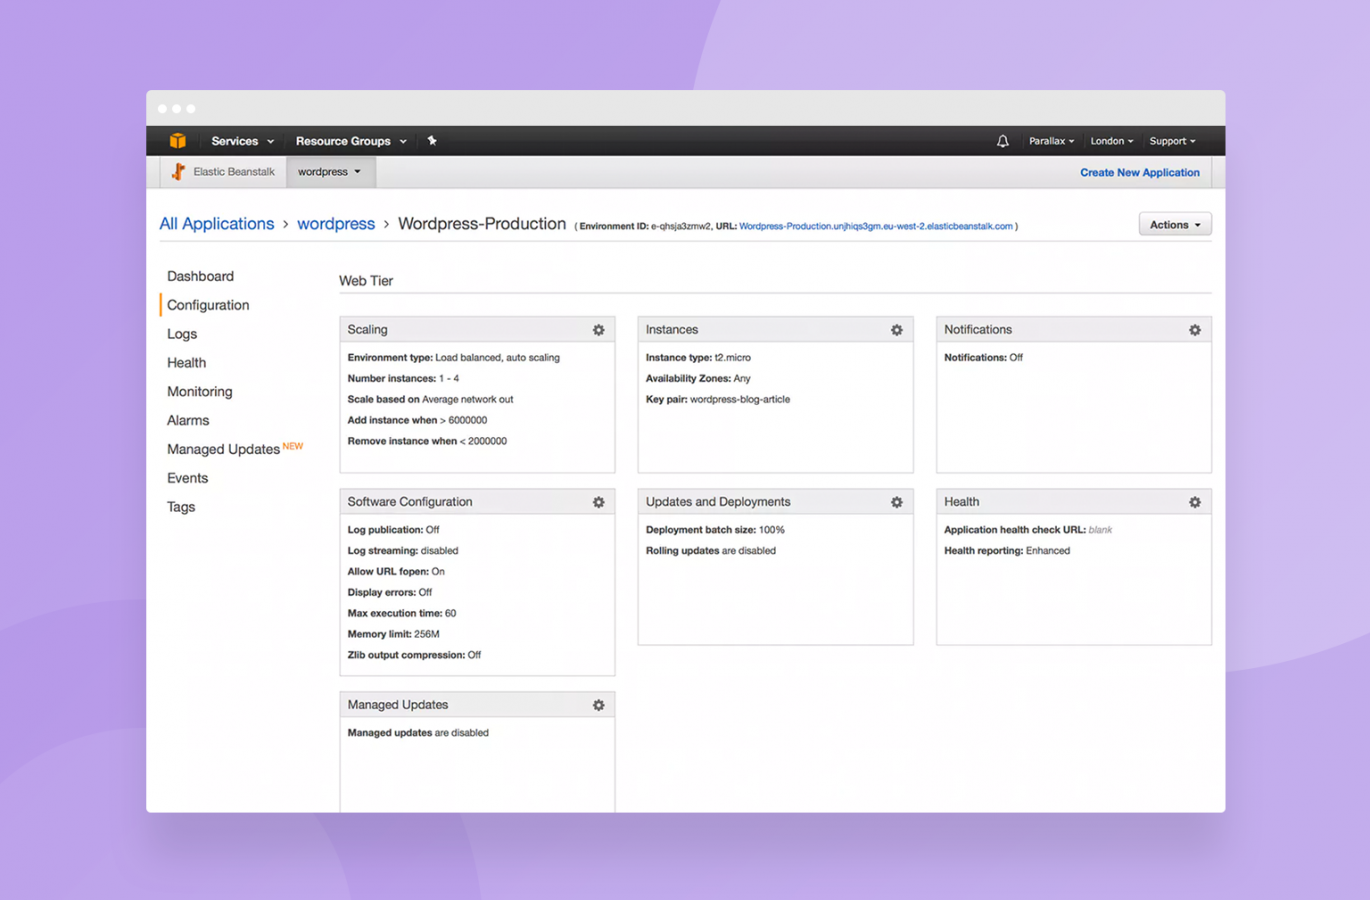
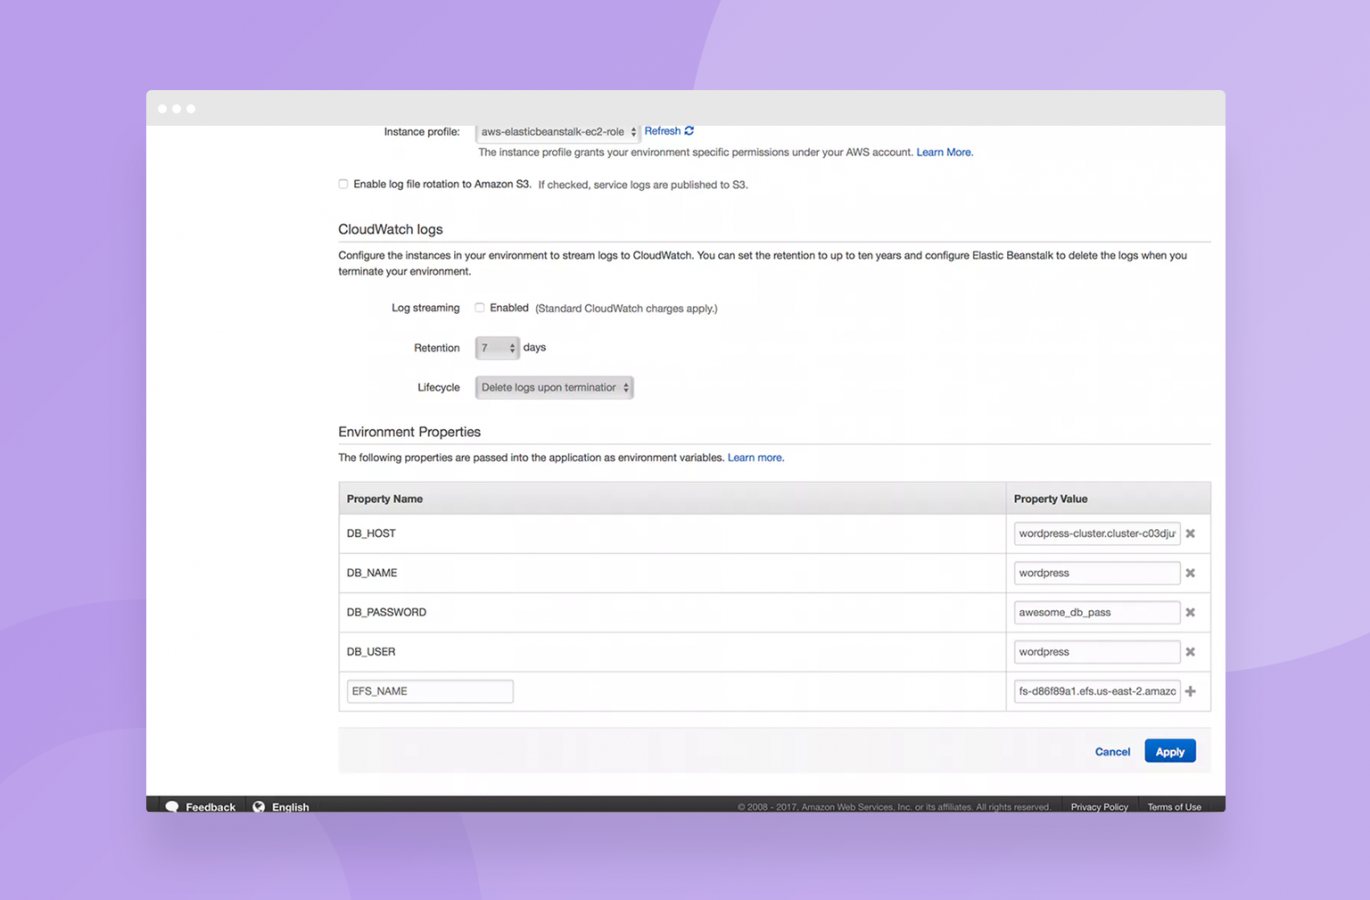
Open “Software Configuration” and scroll to the bottom:
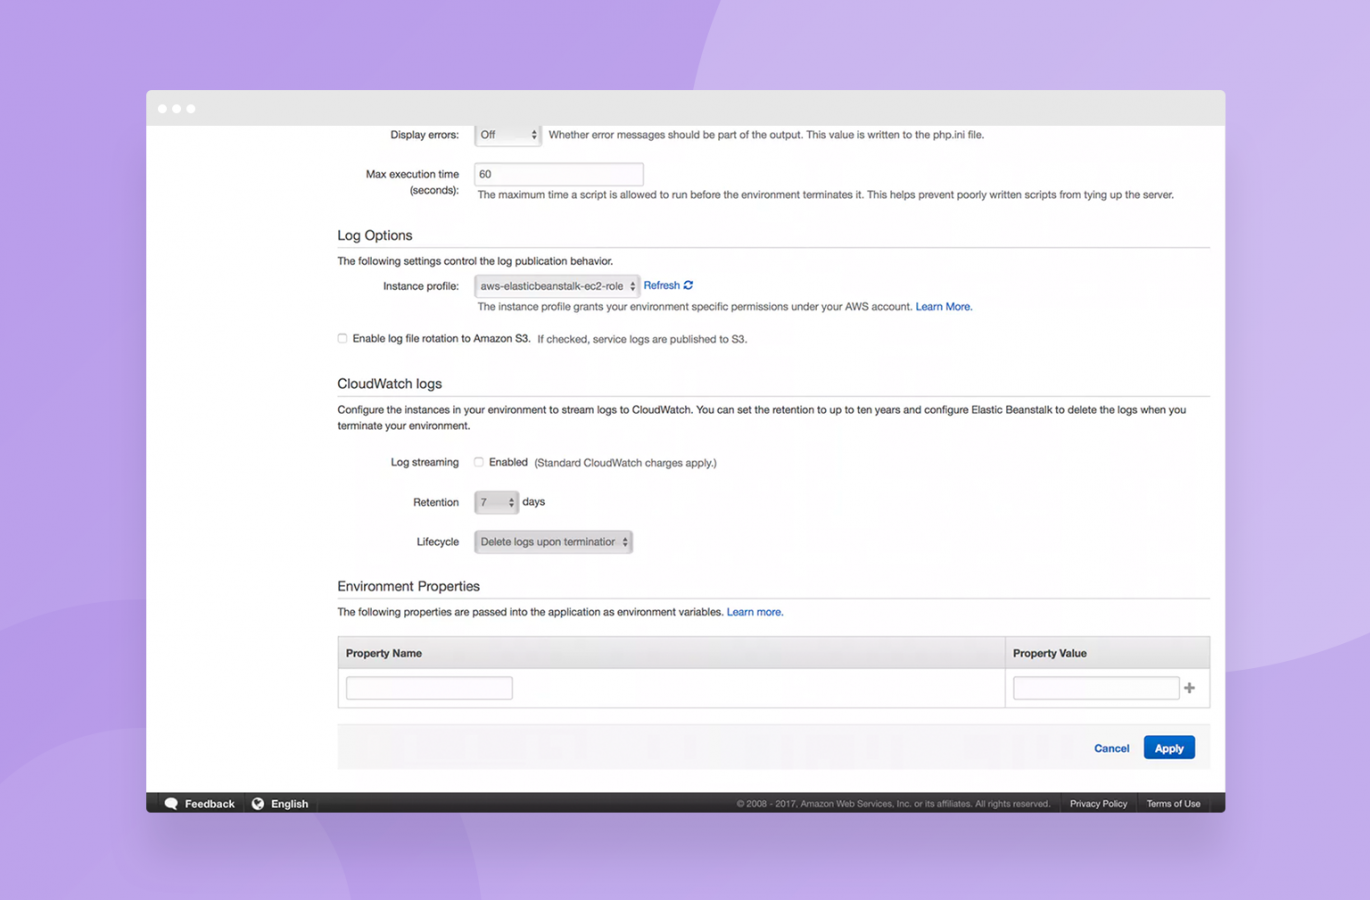
These Environment Variables/Properties will always exist in this environment. We’re going to add a few so that Wordpress always knows where to find the database:
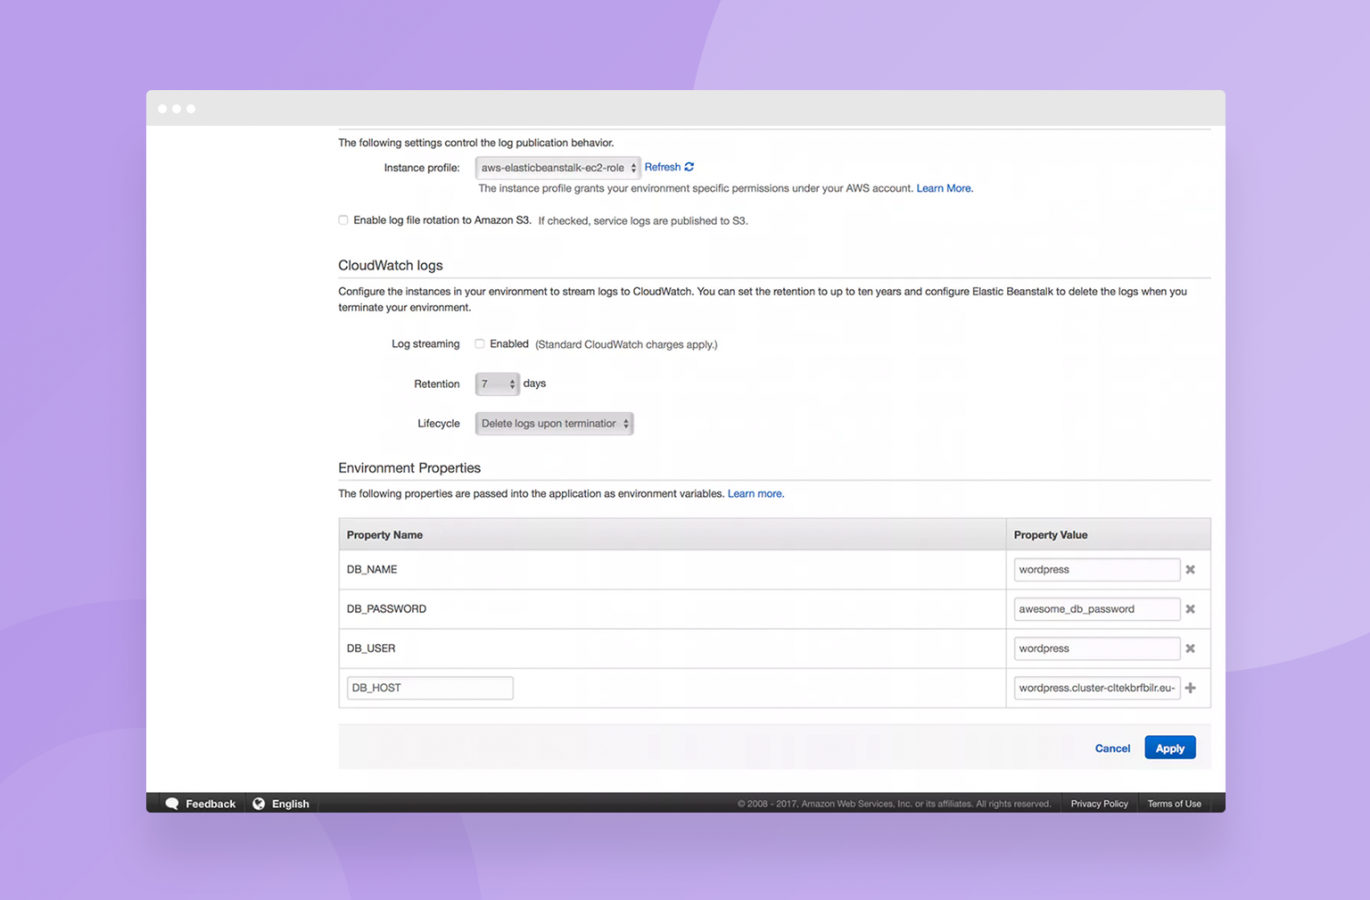
Once you hit save and apply, you can now safely use these environment variables in your wp-config.php file.
What was:
/** The name of the database for WordPress */
define('DB_NAME', 'wordpress');
Can now be called up as:
/** The name of the database for WordPress */
define('DB_NAME', getenv('DB_NAME'));
That’s PHP reading the value of the property from the environment variable/property that we set in Elastic Beanstalk.
To help with this (and because at this point you won’t actually have your generated wp-config.php file to hand), we’ve included a reference file that has been modified for you.
You can download it here but please remember to change your secret keys from line 49 onwards using the instructions in the file otherwise your site may end up being quite easy to hack.
Once you’ve changed the secret keys, drop this file into your Wordpress folder locally and commit it. After dropping it into the folder, run:
git add -A
git commit -m "added wp-config file"
eb deploy
Elastic Beanstalk will take a while to deploy your changes and once done, you’ll have a working wp-config.php file that will survive you rebooting, removing instances, scaling your setup etc.
What about uploads?
You may have put one and one together here. What else in Wordpress writes files to disk? Oh yeah, that’s right: The uploads.
Currently, you have a Wordpress site that will survive reboots. So far so good. And if you write a post or a page, it will still be there too as it’s saved in the database. But the uploads aren’t – they’re just saved locally on disk. We need to change that.
Fortunately, there’s an AWS Service that’s perfect for this job. It’s called Elastic Filesystem and is essentially a big (really big actually) shared drive. We’re going to attach this to our web servers so that when one web server gets a file uploaded to it, it’ll stay there and be accessible by other web servers too.
We need to add the final piece (for now) to our architecture to make it look like this:
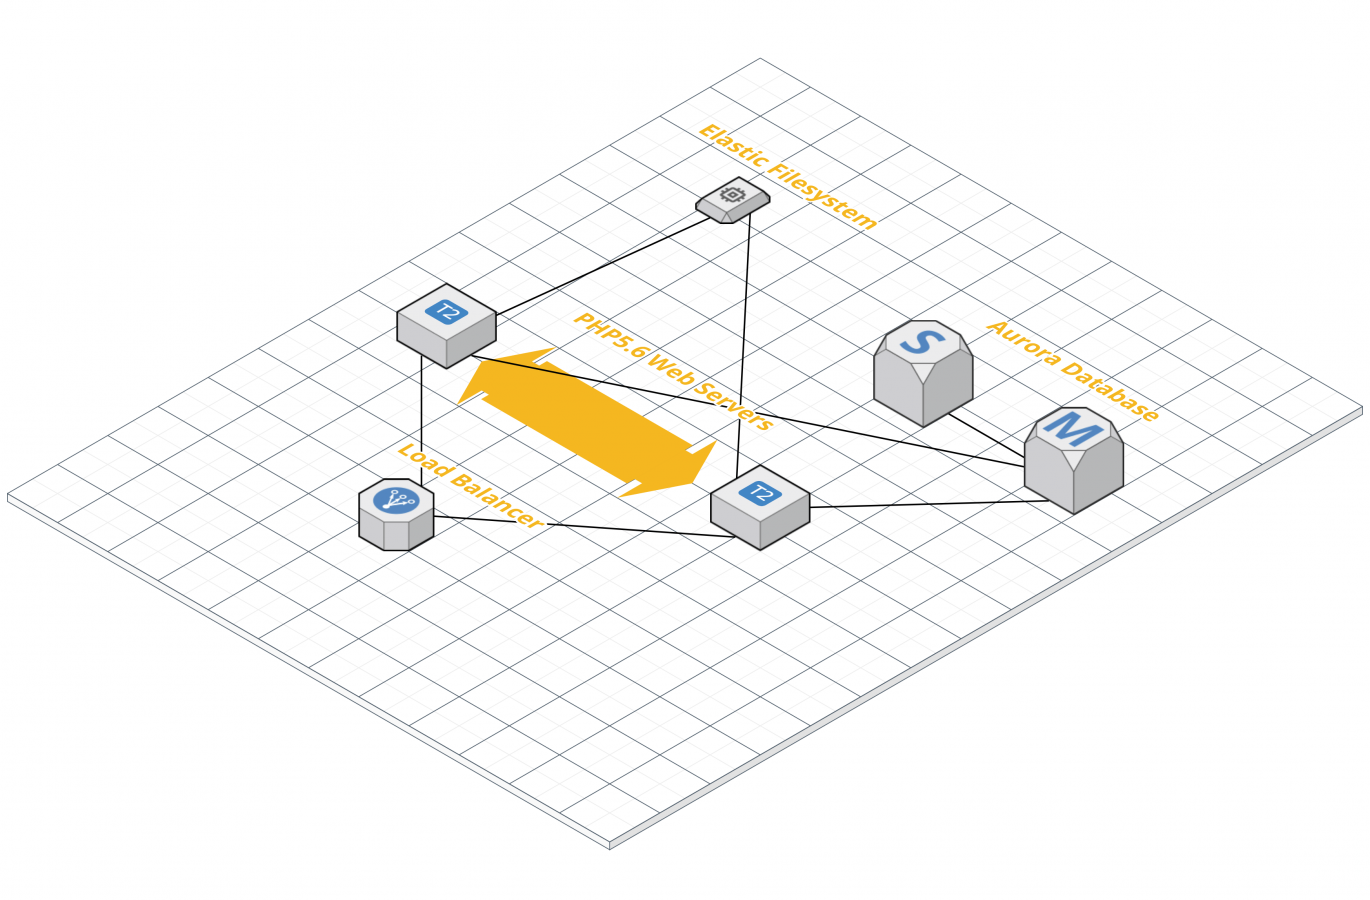
Elastic File System (EFS) is an interesting product: It lets you mount a shared drive. So far so good. The bit that’s interesting about it is how you provision and set it up.
With EFS you’re only billed for your usage, don’t have to pre-provision an amount of storage space and can upload up to 8 exabytes per volume to it. That’s a lot of cat pictures.
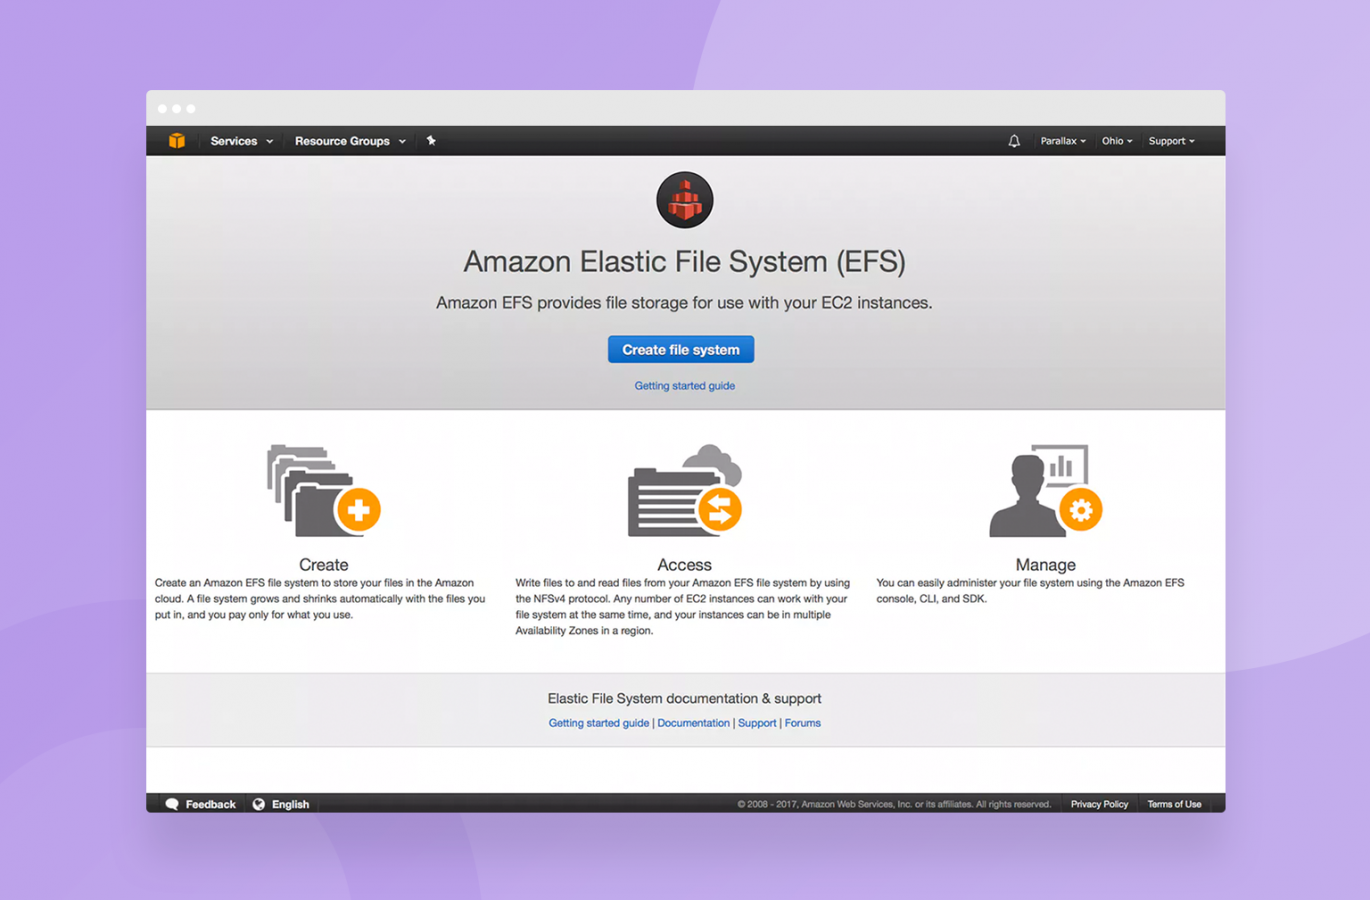
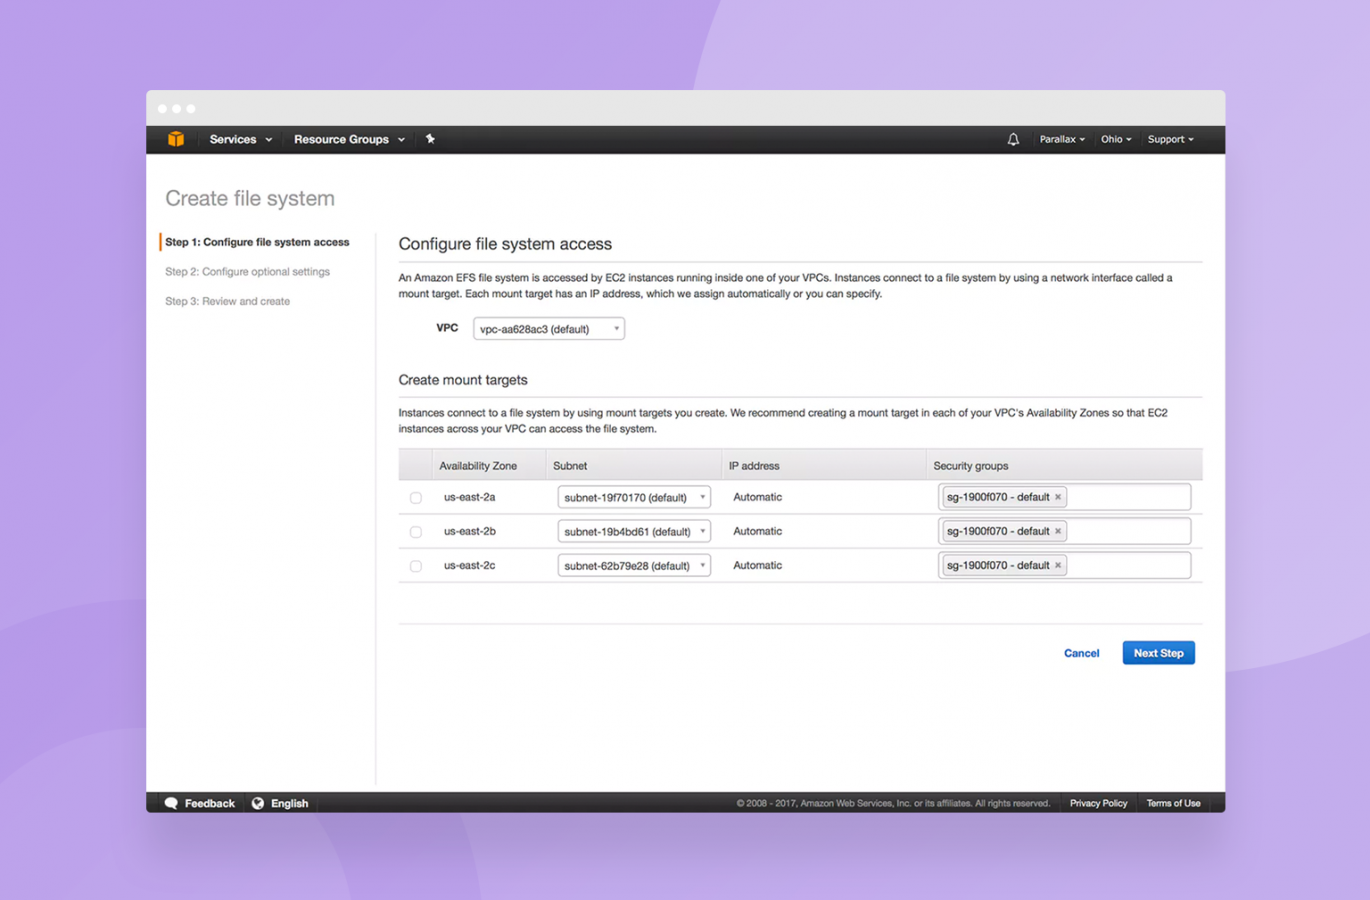
In fact, you could store multiple photos of every cat that has ever lived, ever, on one EFS drive. You probably don’t need 8 exabytes but you do need somewhere for your Wordpress uploads to live, so we’re going to set up a volume. Open the AWS Console and find EFS:
Choose the default VPC as before and make sure all of the availability zones are ticked, then hit next step.
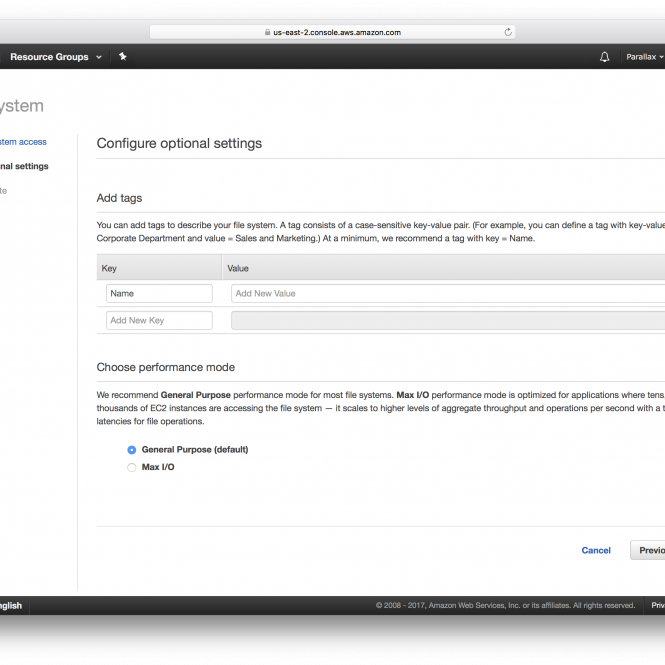
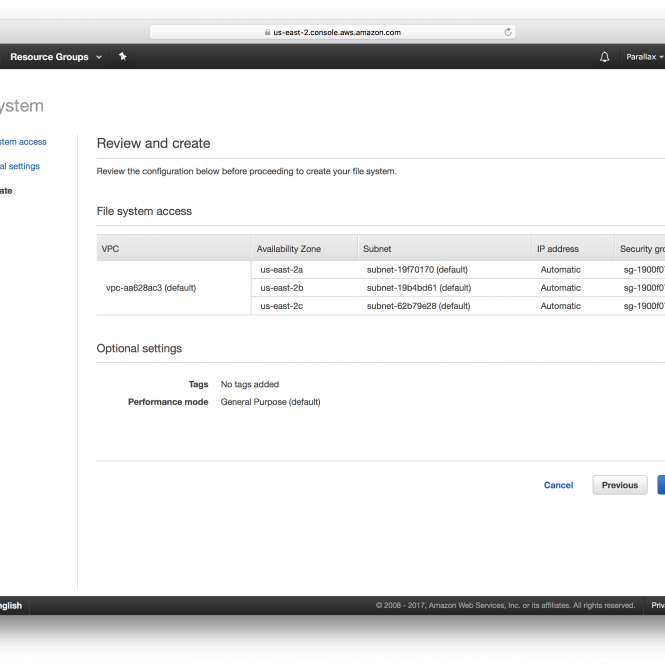
The defaults on both the next screens are fine, just click next:
Wait until the life cycle state is ready. It’ll say creating for a while before finally deciding it’s finished. You want to consider taking up a hobby such as knitting – anything devops-y involves some waiting around time.
Next we’re going to mount the volumes in the right place, which means a bit of configuration for Elastic Beanstalk as it’s not a service that EB supports from the Console (yet).
Amazon have documentation on the feature, called .ebextensions that we’re going to be using. I’ve provided a file to copy and drop into your project below if this sounds scary, otherwise read on for a brief explanation:
.ebextensions are more or less comparable to Chef scripts (or Ansible, Puppet, the other one etc.) and are essentially scripts that are run at certain points in an instance’s lifecycle.
We’re interested, in this case, in installing the NFS-client to mount the EFS volume and then to actually mount the volume.
Once the volume lifecycle is in a “Available” state, note the DNS name that you’ve been provided with:
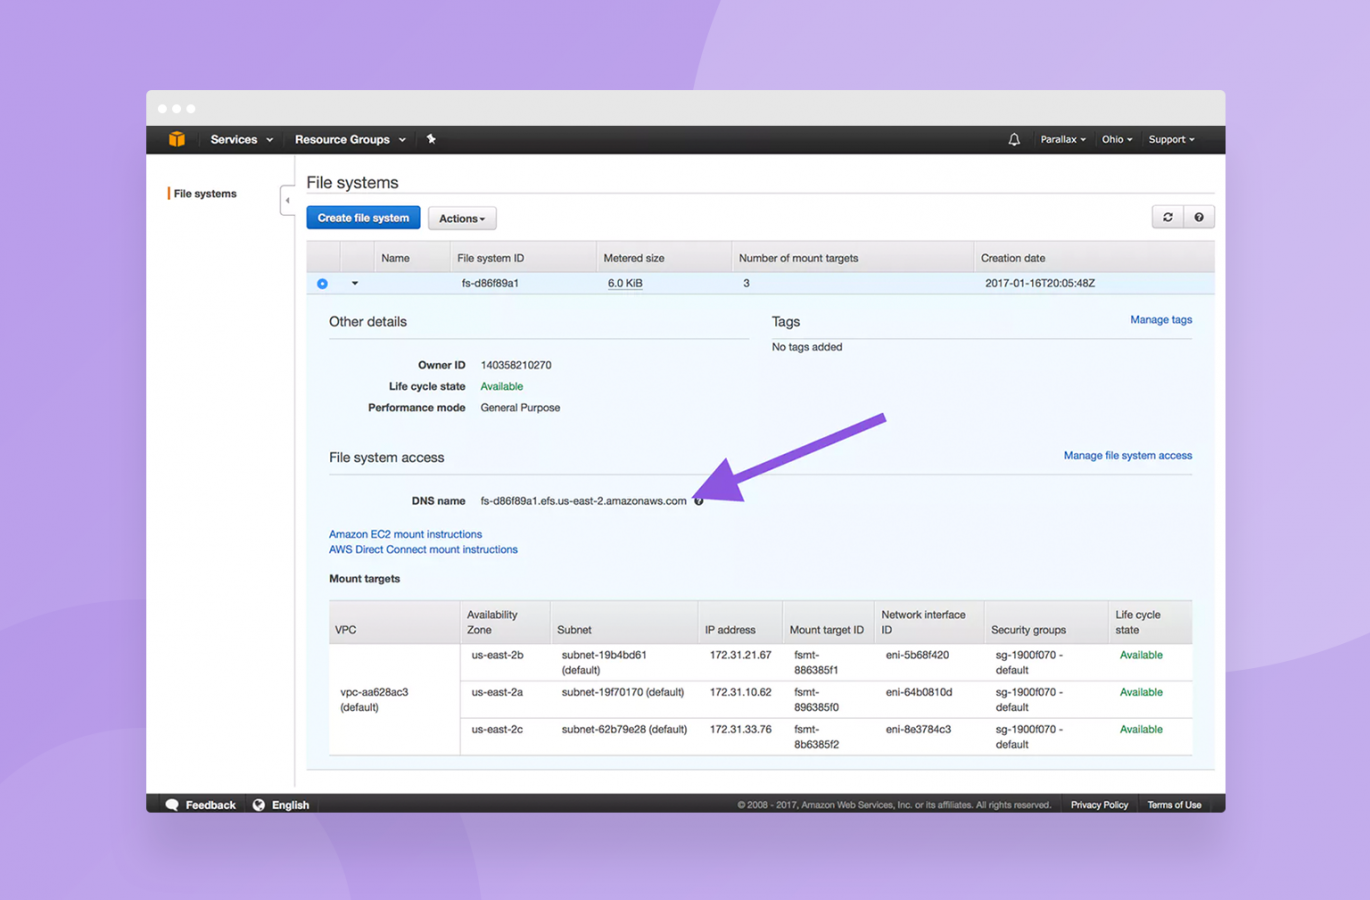
We’re going to drop this into another Elastic Beanstalk Environment Variable, called “EFS_NAME”:
Next we’re going to create a folder called .ebextensions in our project root and put the following file into it, called “efs.config”:
packages:
  yum:
    nfs-utils: []
    jq: []
files:
  "/tmp/mount-efs.sh" :
    mode: "000755"
    content: |
      #!/usr/bin/env bash
      mkdir -p /mnt/efs
      EFS_NAME=$(/opt/elasticbeanstalk/bin/get-config environment | jq -r '.EFS_NAME')
      mount -t nfs4 -o nfsvers=4.1,rsize=1048576,wsize=1048576,hard,timeo=600,retrans=2 $EFS_NAME:/ /mnt/efs || true
      mkdir -p /mnt/efs/uploads
      chown webapp:webapp /mnt/efs/uploads
commands:
  01_mount:
    command: "/tmp/mount-efs.sh"
container_commands:
  01-rm-wp-content-uploads:
    command: rm -rf /var/app/ondeck/wp-content/uploads
  02-symlink-uploads:
    command: ln -snf /mnt/efs/uploads /var/app/ondeck/wp-content/uploads
This file causes Elastic Beanstalk to mount the EFS volume on /mnt/efs, remove the wp-content/uploads folder (if it exists) and symlink it to /mnt/efs/uploads so it persists and is shared between instances.
One last time, run eb deploy and you’re good to go.
In Conclusion
You now have a working, scalable, fault-tolerant Wordpress install running in Amazon Web Services.
You can add and remove servers, manage your database capacity separately to your web server capacity and have a persistent store for your Wordpress uploads folder.
There’s a few other topics that are related that we can look at covering off in a follow-up including Route 53 so you can get the site running on your own domain and CloudFront CDN (aka how to make your Wordpress site insanely fast) and how to actually make the site scale itself up and down automatically. Let us know in the comments if you’d like us to post a follow-up article on these!